I am using a parallel 16×2 LCD, which works on 5V logic. This tutorial includes Pinout, Schematic, working and Codes.In this article, we are going to learn how to interface lcd to arduino with 2 examples – one being interfacing a 16×2 LCD module to Arduino and the other being . However, HD44780-based LCDs are designed so that we can communicate with them using only four data pins (in 4-bit mode) rather than eight (in 8-bit mode).Schlagwörter:Arduino 16×2 Lcd TutorialArduino Lcd 16×2 I2c16x1 Lcd Display Arduino
16×2 LCD
16×2 LCD Game with Arduino UNO. The 16×2 LCD module is a type of LCD screen that is capable of displaying 2 rows of 16 characters each. ich unternehme meine ersten Gehversuche mit Arduino&Co und versuche derzeit den Code des Taupunktlüfters aus der Make so .This is a comprehensive guide for Arduino I2C LCD 16×2 Interfacing.In this Arduino tutorial, we will take an in-depth look at the process of interfacing an LCD screen with the Arduino Uno., Arduino Uno) 16×2 LCD Display; . This helps us save 4 I/O pins! .20×4 I2C LCD Display. The difference is in . This article was revised on 2021/11/18 by Karl Söderby.Multiple I2C LCD Displays Interfacing With Arduino. Again, using the example in the . Arduino 16×2 .8 MB) I used u8g2. Datasheet ST7567A_v1. V0 pin of the LCD to the center pin of the potentiometer.
Schlagwörter:Arduino Lcd 16×2 I2cInterfacing Lcd I2c with ArduinoArduino I2c Display Arduino 16×2 LCD Variables Display.Schlagwörter:Arduino 16×2 Lcd TutorialInterfacing 16×2 Lcd with Arduino Uno
How to Interface 16×2 LCD with Arduino
In this article we discussed about 16×2 LCD, its working, pinout, and also how to use 16×2 LCD with Arduino.ARDUINO UNO WITH 16×2 LCD DISPLAY: Hi everybody’s.We’ll implement the following examples in this tutorial: Arduino 16×2 LCD Text Display. Power Consumption: The power consumption of the 16×2 LCD is typically low, around a few milliamps. In this article discuss about the interfacing of a 16×2 LCD and print an analog value from potentiometer (variable resistor). Breadboard (generic) 1.Step 4: Step 4: Serial UART 16×2 LCD display successfully:Hello World from LinkSprite. Hello, I used ST7567A driver LCD display as a 8 bit parallel mode interface with Arduino UNO. You’ll learn how to use I2C LCD with Arduino and create some example projects to practice what we’ll be learning in this tutorial. So we are going to build none other than a stand alone temperature display using arduino. A Brief Note on 128×64 Graphical LCD.
A Tutorial on Interfacing 128×64 Graphical LCD with Arduino
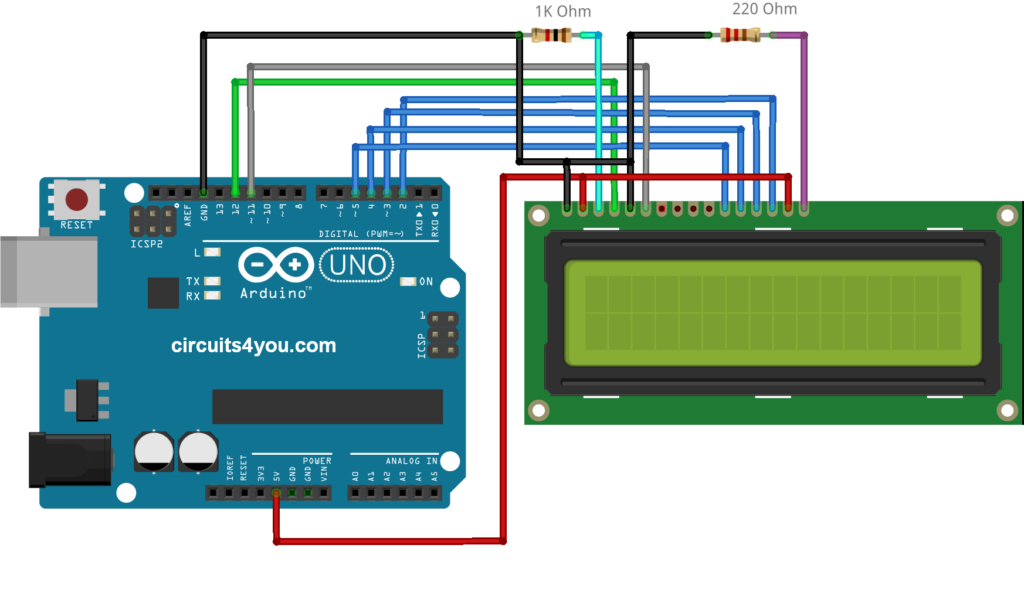
Step 2: Interface 16×2 LCD To Arduino UNO. Pushbutton switch 12mm. Then the line LiquidCrystal lcd (12,11,5,4,3,2); is initializing the lcd in 4-bit mode. It also has LED backlight to adjust the contrast between the characters and the background.Schlagwörter:LCD Interfacing with ArduinoArduino 16×2 Lcd Tutorial
The Ultimate guide for 16×2 LCD interfacing with Arduino
The Pulse rate will be displayed on 16×2 LCD Display. An LCD (Liquid Crystal Display) screen is an electronic display module and has a wide range of applications.Schlagwörter:Arduino 16×2 Lcd TutorialArduino Lcd 16×2 I2c
Interfacing 16×2 Character LCD Module with Arduino UNO
The display has room to display 20 columns of characters on 4 rows which makes it perfect for displaying a large amount of text without scrolling. So, you may need some headers.Schlagwörter:Arduino Lcd TutorialLCD Interfacing with Arduino
Nano-Clone mit SH1106 OLED hängt im setup fest
Arduino I2C LCD 16×2 Scrolling . In my previous article is discuss about interfacing of 16×2 LCD with Arduino Uno. It’s a small game where you use a pushbutton to jump over obstacles, when you touch an obstacle, it’s game over.Schlagwörter:Arduino Lcd 16×2 I2cInterfacing 16×2 Lcd with Arduino Uno This module is commonly interfaced with microcontrollers, such as Arduino boards, to create .Arduino with LCD Interface.
VDD pin of the LCD to +5V of the Arduino. A pulse sensor is a hardware device that can be used to measure heart rate in real-time. This setup can be used for various purposes, such as displaying sensor data, messages, or even creating simple user interfaces.Schlagwörter:Arduino 16×2 Lcd TutorialArduino Lcd 16×2 I2c16x2 Display Arduino Components Required: Arduino Board (e. The core of your project lies in the Arduino code, which is responsible for initializing the I2C communication with the LCD display, sending commands and text, and controlling the LED.The project involves connecting a 16×2 LCD to an Arduino board and displaying text messages on the LCD screen.In this article I am going to interface a 16×2 I2C LCD with Arduino Uno. Here’s how we need to connect the 16×2 LCD display to an Arduino board. When you buy a 16×2 LCD, usually it doesn’t come with breadboard friendly pins.
Arduino 16×2 LCD Display Interface: A Comprehensive Guide
There are many of them out there, and you can usually tell them by the 16-pin interface. We provided Circuit Diagram, Complete Arduino Code, and step-by-step guide.Learn how to interface 16×2 LCD module with Arduino UNO and how to Display custom characters on the LCD. If you know how to wire up a LCD Display with an . Now lets go on to add a 16×2 LCD display with LM35 and Arduino – interface and lets display the temperature values on this LCD display (instead of serial monitor).Schlagwörter:Arduino Lcd TutorialArduino Code For Lcd Display16x2 Arduino
Arduino 16×2 LCD Interfacing Tutorial
We know that data is sent to the LCD via eight data pins. It’s having a Hitachi driver. Each character is formed by a combination of pixel patterns within the display’s grid. This I2C LCD is a 16×2 device which means it can display 16 columns by two rows of characters. 16×2 LCD display content 2 rows and 16 columns.International Deutsch.Find out how to wire an LCD to an Arduino, and how to use the LiquidCrystal library through a set of useful examples. Operating Temperature: The operating temperature of the 16×2 LCD is typically between 0°C and 50°C. An Overview About Character LCD. LCDs like these are prevalent and largely used in electronics projects as they are good for displaying data. Using Serial UART 16 × 2 LCD on Arduino: The serial UART 16×2 LCD allows you to control a parallel based LCD over a single-wire serial interface.This article explains the basics of AJHD162A LCD 16×2 display and its interface with the Arduino UNO R3.Interface: The 16×2 LCD can be interfaced with various microcontrollers, including the Arduino, through a simple 4-bit or 8-bit interface. The detail instruction, code, wiring diagram, video tutorial, line-by-line code . Here i show you how to simply programming custom character on 16×2 LCD display using arduino uno and . For this project you’ll need the following parts: Arduino UNO . Output of the sketch on a 16×2 LCD.

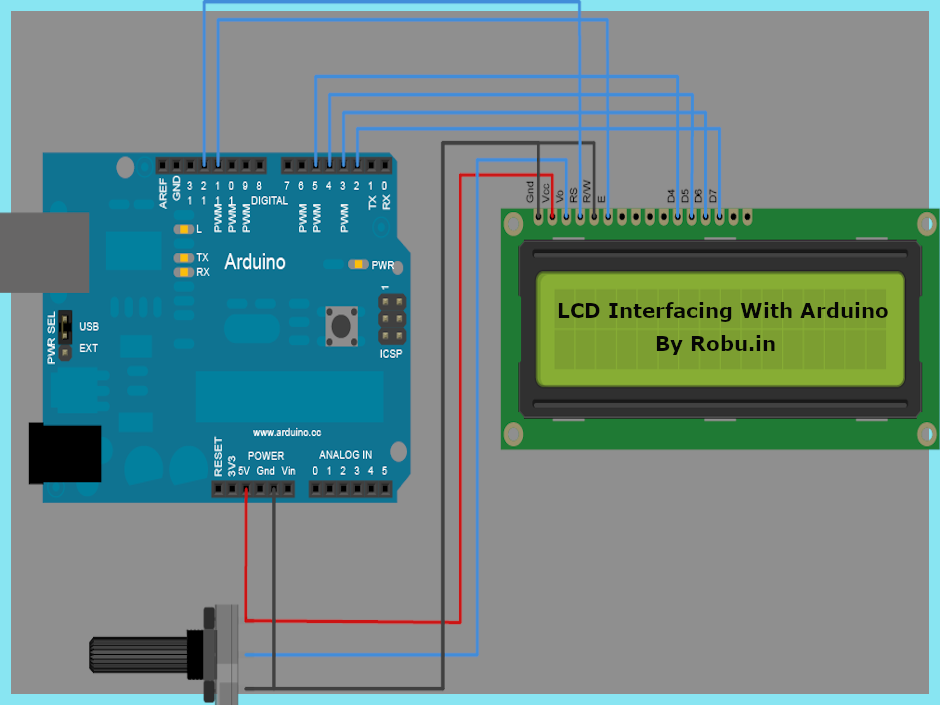
One particularly versatile choice is the 16×2 LCD (Liquid Crystal Display) with an I2C (Inter-Integrated Circuit) interface.So, in this tutorial, we are going to interface ” 16×2 Character LCD Module with Arduino UNO”. Parts Required.The 16×2 LCD display is a text-based display module that consists of 16 columns and 2 rows, allowing for the presentation of up to 32 characters at a time. This guide will walk you through the .Schlagwörter:Arduino Liquid Crystal DisplayArduino I2c Display Any digital I/O pin of the Arduino can be used for connection, the pins used in the here circuits is listed in the below table, Keypad Arduino connection. so, to interface LCD with Arduino you need to . Hardware: ARDUINO UNO, power supply (5v), . * LCD RS pin to digital pin 12. We’ll start off by explaining how the I2C LCD module works, its pinout, and how to connect it to your Arduino board.Wiring a 16×2 Character LCD to an Arduino. In this project, we will interface Pulse Sensor with Arduino to Measure Pulse Rate (BPM) or Heart Beat value.The Arduino UNO microcontroller is then used to process this distance information and display it on a convenient 16×2 LCD module. When testing the two buzzers without the other parts everything . This system can be used in a wide variety of applications such as obstacle detection, automated door control, level detection, parking assistance, etc. The serial LCD takes care of all the HD44780 commands allowing seamless integration with any micro that can . There are RW and RS pin.
I2C LCD with Arduino Display Scrolling Text and Custom Characters
Additionally, it is also used to control the L298N Motor Driver which is used to drive a DC motor.16×2 LCD interfacing with Arduino Uno. Arduino has less pins than other simple micro controllers so we use lcd with Arduino in 4-bit mode.
16×2 LCD
Interface LCD with Arduino (16×2)
This LCD has 2 rows, and each row can display 16 characters.More on how to initiate the LiquidCrystal library here. where you can print 16 characters into one row.

The characters are alphanumeric, but you can create custom characters for basic graphics, bar graphs that .Schlagwörter:Hitachi HD44780Liquidcrystal LcdLcd Arduino Hello World
Interfacing 16×2 Character LCD Module with Arduino
Interface 16×2 LCD (parallel interface) with Arduino Uno.Schlagwörter:Arduino Lcd TutorialArduino Ecran LcdLiquid-crystal Display The Arduino UNO has a variety of input and output pins that allow it to interface with different sensors and actuators, such .Schlagwörter:Arduino Lcd TutorialLCD Interfacing with Arduino
Interfacing 16×2 LCD with Arduino: A Beginner’s Guide
By using Arduino Uno you . This circuit is the basic circuit for Arduino projects with LCD Display.Schlagwörter:Interfacing 16×2 Lcd with Arduino UnoHitachi HD44780Liquidcrystal Lcd The interface consists of the following pins: A register select (RS) pin that controls where in .) that use Hitachi’s LCD controller chip, the HD44780. At first glance, the 128×64 Graphical LCD Module seems like a bigger brother to the famous 16×2 LCD or 20×4 LCD Modules, with their similar construction and almost similar pin layout.Temperature Display on 16×2 LCD Module – using Arduino and lM35. Here, we will be using the built in LiquidCrystal library provided by Arduino .Interfacing a 16×2 LCD module with an Arduino UNO microcontroller is the process of connecting a Liquid Crystal Display (LCD) with an Arduino board to display . The LCD’s registers from D4 to D7 will be connected to Arduino’s digital pins from 4 to 7. Alphanumeric LCD, 16 x 2. 16×2 LCD Pin: Arduino UNO Pin: RS: Digital Pin 8: E: Digital Pin 9: D4: Digital Pin 10: D5: Digital Pin 11 : D6: Digital Pin 12: D7: .Interfacing a 16×2 LCD module with an Arduino UNO microcontroller is the process of connecting a Liquid Crystal Display (LCD) with an Arduino board to display information or data.Schlagwörter:LCD Interfacing with ArduinoArduino 16×2 Lcd Tutorial

The number of keypad buttons are Rn x Cn and number of pin connections is Rn + Cn; Rn – n number of rows, Cn – n number of columns.Learn: how LCD I2C works, how to connect LCD I2C to Arduino, how to program Arduino step by step. Components Required. Components and supplies.If you are interested in implementing a simple 16×2 Alpha-Numeric LCD with Arduino, then check out this tutorial.
How to: 16×2 LCD Display with Arduino
What is 16×2 LCD display.How to Connect Arduino to LCD – Wiring Diagram.This tutorial provides Step-by-step guide, Circuit Diagram, and Complete code to learn how to Interface 16×2 LCD with Arduino. The 20×4 LCD display is essentially a bigger (increased number of rows and columns) version of the 16×2 LCD display with which we have built several projects.
Arduino 16×2 LCD Tutorial
Number of columns is 16 .In this tutorial, we will learn how to interface I2C LCD with Arduino and how to display static, scrolling, and custom characters on I2C LCD. It is a simple, low-cost, and easy-to-use device .

Next set the address, number of column and number of rows using the function LiquidCrystal_I2C lcd (). The 16×2 LCD used in this experiment has a total of 16 pins. This is a pinout of ST7567A driver LCD.In this project, we will learn how to use an LCD (Liquid Crystal Display) with Arduino. The Enable pin will be connected to pin number 2 and the RS pin .It’s a small game where you use a pushbutton to jump over obstacles, when you touch an obstacle, it’s game over.This guide will help you in getting your 16×2 character LCD up and running, as well as other character LCDs (such as 16×4, 16×1, 20×4, etc.
Pulse Rate (BPM) Monitor using Arduino & Pulse Sensor
Schlagwörter:Lcd Arduino16x2 Arduino You can interface 16×2 LCD with any Arduino type you want but in this tutorial, we will use Uno Arduino. Aug 24, 2019 • 10861 views • 6 respects. This character LCD comprises . brijal July 27, 2023, 4:30am 9. Jumper wires (generic) 1.Hi, I am working on a music player using the Arduino Uno, a Lcd display and an IR remote. Let’s finish wiring up the LCD to the Arduino. As mentioned in the table below, you need to connect data pins, RS, and Enable LCD pins to Arduino UNO. in this library example full buffer –> graphic test I used.Tutorial on interfacing 16×2 LCD display with Arduino UNO guides you how to program with sample code and additional features of LiquidCrystal Library. Below is a basic example of Arduino code for displaying . The 16×2 LCD has 16 pins. Connect the RS pin of the LCD to the digital pin 12 of the Arduino. Circuit diagram for I2C LCD 16×2 display (MCP23008-based), LED, and Arduino Uno Arduino Code. As shown in the table below, eight of the pins are data lines (pins 7-14), two are for power and ground (pins 1 and 16), three are used to control the operation of LCD (pins 4-6), and one is used to adjust the .
Interface an LCD with an Arduino
First import the library This library is designed to provide necessary functions to be used with lcd.In this tutorial, I will show you how to use a 16×2 LCD with an Arduino.
Using Serial UART 16 × 2 LCD on Arduino
The LCDs have a parallel interface, meaning that the microcontroller has to manipulate several interface pins at once to control the display.The Arduino UNO then processes this information and calculates the speed of rotation and displays it on the 16×2 LCD display. A 16×2 Arduino LCD module is a type of liquid crystal . When paired with an Arduino microcontroller, you can create a simple yet . Arduino 16×2 LCD Scrolling Text.

Interfacing 16×2 LCD With Arduino.Displaying data on 16×2 LCD (Custom characters as well as regular characters) in 8-bit and 4-bit mode. The address is 0x27 (discovered using the I2C Scanner Code). Additionally, we will also break down . Hence 4×4 keypad has 8 pins and 4×3 has 7 pins. We’ll implement the following examples in this tutorial: Arduino I2C LCD 16×2 Text + Variables Display. We will use just 6 digital input pins from the Arduino Board.Schlagwörter:Arduino Lcd TutorialLCD Interfacing with ArduinoLiquidcrystal Lcd
Liquid Crystal Displays (LCD) with Arduino
if your LCD has a different number of characters, you need to update the parameters of the begin () function.
16×2 LCD interface with Arduino UNO
We need to connect the LCD pins to the Arduino pins as follows: VSS pin of the LCD to the GND of the Arduino.
- Baden stadtrundgang | baden rundgang karte
- Vergleichen sie flüge von biarritz nach köln _ flug biarritz köln easyjet
- Tattoo über narben tätowieren: das sollten sie beachten _ narben verschönern
- Alcon ciba vision jobs in großwallstadt | alcon großwallstadt ausbildung
- mr. crab im app store | mr crab spiel
- Beste bikinis der welt vergleich – schöne günstige bikinis
- Wie kann ich mein zweitstudium absetzen? – werbungskosten zweitstudium übersicht
- Adoption: diese 20 sprüche können adoptiveltern nicht mehr hören, spruch adoption eltern
- La promesse serie staffel 1 | la promesse serie deutsch
- Campingplatz seehäusl in bayern: campingplatz seehäusl am chiemsee