This would be for . Move your hand in front of sensor. While setting up your project and following the steps you may encounter many weird situations. STEP # 2 ( Make LED Connections ) Cathode (-) – To GND of Arduino.First, connect the four LEDs to the Arduino. This article, however, discusses how to detect . In this tutorial you learn how to use an infrared sensor in combination with the NEC Infrared Transmission Protocol. When an object passes through Sensor_1 and Sensor_2 consecutively, LED_2 output will remain HIGH and LED_1 output will remain LOW at the same time. When the robot is in motion, the green LED is lit.Although not technically sensors, the laser, buzzer and LEDs are used to give visual and audible feedback from the sensors. When vehicle passes by a particular IR sensor it senses the position . Table of Contents. To make Line Following Robot and detection of object, IR sensor is best . The circuit would scan the rows or columns one at a time, in 8 or 16 steps. Made by Maritess Marmito. An infrared sensor is an electronic module which is used to sense certain physical appearance of its surroundings by either emitting and/or detecting infrared radiation. Project description.
Infrared Sensor Module Interfacing with Arduino
Schlagwörter:Arduino Ws2811 Led Strip ControllerArduino Ws2812 Led Code The Analog Reading shows value which less than 50. The function of the potentiometer is to control the brightness of the LCD.Schlagwörter:IR Sensor Interfacing with ArduinoIr Sensor Interface with Arduino 1) Connect the VCC and GND terminal of the IR proximity sensor module with the 5V & GND pin of the Arduino board.This smart parking system project consists of Arduino, six IR sensors, one servo motor, and one LCD display. 2) Connect the OUT pin of the IR sensor with pin digital I/O pin . TCRT5000 IR Sensor Module detects nothing. Where the Arduino is the main microcontroller that controls the whole system.Step by Step Guide for IR Sensor Interfacing with Arduino. Here you can see some typical packaging for an IR receiver. It is pin 2 in our case. And other four IR sensors are used to detect . At the end of this tutorial, you build a project with the VS1838B infrared sensor to read and encode infrared signals from a remote control. Control an LED with the Remote Control .
How to Set Up an IR Remote and Receiver on an Arduino
Furthermore, the Arduino can also be used to . For this instructable you are gonna need: – Arduino. – 1 IR LED receiver (photodiode with 2 pins, not the phototransistor with 3 pins) – IR LED emitters (as much as you can get, but at least 2) – 100K resistor (brown black yellow) – Jumper wires.
Need Help ! Using two IR sensors to control LED
here we are using 4 IR sensors that senses the position of the vehicle,each IR sensor controls 3 LED’s. If sensor2 doesn’t triggers within 5 seconds it should turn off LED.Learn to use an IR remote with Arduino and VS1838B IR receiver to control LEDs.With a simple IR transmitter and receiver, you can make remote controlled robots, distance sensors, heart rate monitors, DSLR camera remote controls, TV .Schlagwörter:IR Sensor Interfacing with ArduinoIr Sensor Interface with Arduino
IR Remote and Receiver with Arduino Tutorial (4 Examples)
This article, however, discusses how to detect obstacles with the help of a simple IR LED and a matching sensor.
Arduino IR Sensor and Remote With LCD : 4 Steps
– Electrical tape.จากโค้ดตัวอย่าง ถ้า Sensor IR Infrared ตรวจจับวัตถุข้างหน้าได้ จะส่งค่าสัญญาณ digital ลอจิก 0 มาให้ Arduino Arduino จะสั่งให้หลอดไฟ LED ติด ตัวต้านทานกล่องสีฟ้า สามารถ . In order to program Arduino to do something when you press a key on the remote, you should first have the code corresponding to that key. The count is modulated at 38 kHz when the receiver is using TSOP1738. Here are some ideas to b.Learn how to use an infrared sensor in combination with the NEC Infrared Transmission Protocol to build an infrared receiver with a VS1838B IR sensor.Schlagwörter:Arduino Infrared Sensor TutorialEsp8266 InfraredThe first step is to define the Arduino digital pin that we have connected with the IR sensor’s OUT pin.Please SUBSCRIBEto my channel for more projects. Infrared Receiver. Apps and platforms. Beside VCC and GND pin, the sensor has only one output pin that should be connected t.Step 1: Materials.Using Arduino LEDs and Multiplexing.IR Sensor is a device that detects the object in front of it using IR or Infrared waves.Hello, I am trying to figure this out to add to a bigger project and then eventually a robot, I need to get a value from the IR Sensor (just an IR light next to an IR resistor) to measure two different values, one when it is close to a hard surface and one when it is far away (on top of table, off of table) I am getting about 3000-6000 on the .
here we are using 4 IR sensors that senses the position of the vehicle,each IR sensor controls 3 LED’s. STEP # 1 ( Make IR Sensor Connections ) VCC – To VCC of Arduino. Follow the schematic to make the circuit. Those articles and projects focused on capturing and replicating data sent by an IR remote control, allowing an Arduino to control electronic devices such as a TV. First, you need to install Arduino IDE Software from its official website Arduino. Normally LED_1 output remains HIGH.Schlagwörter:Ir Sensor and Led ArduinoInfrared Light
Interfacing IR Sensor with Arduino
Open Arduino IDE, select the right board and port. Here, the voltage produced by the IR Receiver is converted from analog to digital and is used as a reference to know whether the object is detected or not. Hey all, Looking for help with a simple project – but I’m new to the code aspect of Arduino.I’m looking for a step by step help on how to set up my LED display 7 segment (4 digits) with my arduino uno and the IR break beam sensors. Here, a simple count is transmitted from the transmitter using IR LED. Receive the signal and control an LED.Interfacing IR Sensor with Arduino is a first step to understanding how to use an IR sensor in different projects. The infrared receiver detects the incoming infrared signals and converts them into the code (command) representing the button pressed on the remote controller.2 (updating) Project Guidance. Such modules normally incorporate one of the sensors mention. LED (generic) 1. Now it’s your turn. Hello Community ! I am stuck with one project. I want to build an IR counter. When the robot stops, the buzzer sounds and the red LED is lit.It looks like you have D3, D8 and D11 free to use for your added SR04. You can also buy them as an IR module/breakout board on eBay, Aliexpress or Amazon. Learn with Circuit Diagram and Components Required. For this quarter my Exit Product is a DIY .Hello everyone! I’m doing a project which uses two IR Proximity sensors (GP2Y0A02YK0F) to control two LEDs simultaneously.In this tutorial, we’ll interface the IR sensor with Arduino Uno including coding, connection diagram, and listing the components.Arduino IR sensor 1 IR sensor 2 RGB Diffused; 5V: VCC: GND: GND: GND: A0: OUT: 3. Step-by-step guide with code examples for beginners and DIY electronics projects Click Upload button on Arduino IDE to upload code to Arduino.Schlagwörter:Ir Sensor and Led ArduinoArduino Ir Sensor Project
DIY Smart Trash Bin with LEDs and IR sensor
This article discusses how that knowledge can be applied to build Arduino-based devices and projects that can react to IR remotes. Having two IR sensor (NPN NO) to control the LED. We also use 5 LEDs that represent the streetlights, each LED connected to the PWM pins of the Arduino. The IR receiver module is a sensor that detects and receives the infrared signals emitted by the remote controller.To multiplex, you would divide your 128 nodes into 8 columns and 16 rows, or vice versa.Interfacing IR (Infrared) Sensor Module with Arduino UNO to control LED based on object detection, proximity sensing, motion-activated alarmSchlagwörter:IR Sensor Interfacing with ArduinoArduino Infrared Sensor Arduino Intro Last Updated: 23 May 2024. See the change of LED’s state. So here is your . In this tutorial, we will learn how to use an Arduino and an flame . Hence it is commonly used as the main sensor in a line follower robot. The IR sensor will be connected to pin 7 on the Arduino.
Smart Street Light System using IR Sensor and Arduino
In this guide, you will learn how to connect your IR sensor to an Arduino Uno, read its output, and . Here you can find the list of components that you would need to complete this tutorial:eBay links: 1 x Arduino Uno : https://ebay. His sensor can be used to detect objects or obstacles in front of it using reflected infrared light. IR emitter has the duty to emit infrared light. For the LCD, pins 2,3,4,5,11 and 12 will be used. It’s all up to your imagination to see what you can do with this little simple sensor in your hand. Follow all steps carefully from the video tutorial at the end of this post (Highly Recommended). I would also have a button that resets the counter to 0 . Hey guys! Today we are going to learn how to use or how to interface an IR sensor with Arduino. Here is a simple step-by-step guide on “How to install Arduino IDE“.

It is also used to differentiate between black and white colors. Components and supplies. The count is transmitted as it is when the receiver is using IR photodiode. remote control. I decided to add also a IR remote controller to change a program of the lights.Connect the wires using a breadboard to ensure a tidy circuit is made.Schlagwörter:Ir Sensor Interface with ArduinoArduino IR Sensor Tutorial
Interfacing IR Sensor Module with Arduino
The flame sensor is capable of detecting and measuring infrared level emited from the flame, It can be used to detect fire.I am using WS2812B 30/m LED strips connected to Arduino Uno, I am also using a two PIR sensors at the bottom and top of the stairs and one photosensitive sensor mounted at the bottom next to the PIR sensor. The picture above shows the result on the Serial Monitor for the TCRT5000 IR Sensor Module. The Digital Reading shows 0.Step 1: Avoiddance Obstance IR Sensor. You may use multi colour wires as shown in the picture to keep track of the pins on the Arduino. This is, for example, useful for securing .“Interfacing IR Sensor with Arduino is a crucial step in bringing your electronics projects to life. If sensor2 trigger and gives LOW output within 5 seconds then it should remain .Step 3: The Circuit. Connect the GND pin of the IR . An LED is used to indicate the detection of the object.3V : VCC: A3: OUT: D9: GND: D10: R: D11: G: D12: B: Installing Arduino IDE. Using this project we will also learn how to connect this sensor to the Arduino and how the Arduino reads output data from the .

Schlagwörter:Ir Sensor and Led ArduinoInfrared LightInfrared Waves
Detect Obstacles with an Arduino using an IR Sensor and LED
GND – To GND of Arduino. Sep 4, 2017 • 60499 views • 27 respects • led. This count is received at the receiver by an IR photodiode or a TSOP1738.I am wanting to do a project that uses an ir sensor, but first I wanted to understand a bit more. This project is about Smart street light, street light will turn on while vehicle is passing through it.This project shows you how to automatically turn ON and OFF a Light using an Arduino with IR Sensor. Here we will make a basic project, where the IR sensor detects an object and indicated by an LED.In this project, we are using 4 IR sensors that are connected to the digital pins of the Arduino.heetpatel7744 October 31, 2023, 1:46pm 1.Schlagwörter:Arduino IR Sensor and LEDsArduino For Ir Sensor
How to use IR Sensor Module with Arduino
The laser is attached to the IR sensor giving a visual indication of where the IR distance sensor is pointing.To interface the IR sensor module with an Arduino, follow these steps: Connect the VCC pin of the IR sensor module to the 5V pin on the Arduino.DIY Smart Trash Bin with LEDs and IR sensor.Infrared Sensor Tutorial for Arduino, ESP8266 and ESP32. Connect Arduino to PC via USB cable. The infrared flame sensor provides two outputs: a digital output (LOW/HIGH) and an analog output. We want to turn each one of them on or off by a dedicated button of the IR remote. When sensor1 triggers it should turn on LED for 5 seconds.Schlagwörter:IR Sensor Interfacing with ArduinoInfrared Light The main advantages of IR sensors are.I found three different codes (first for stairs with one LED strip on the side of the stairs with a photosensitive sensor, second for stairs where every step have own . Copy the above code and open with Arduino IDE. Hence it is commonly used as the main sensor in a .Schlagwörter:Infrared WavesRobot Using Ir Sensor my goal is to start a race by tripping the 1st set of breakbeam sensors to start the stopwatch, then when crossing finish line, to trip 2nd set of sensors to stop the stopwatch.Supplies
IR Sensor With Arduino: wiring and code explained
Connect the negative of the four LEDs to GND on the Arduino through the 220 ohm . const int IR_Sensor = 2; Inside the setup () function, we will configure the sensor pin as an input pin and the Arduino’s onboard LED pin as the output pin. This pic can be called as the signal pin. Anode (+) – To D13 of Arduino.

In this topic I will . Now that we have a code for each button, it’s time to focus on the way we can use them. TCRT5000 IR Sensor Module detects the obstacle infront. The Digital Reading shows 1.
Interfacing Infrared (IR) Proximity Sensor with Arduino
When vehicle passes by a particular IR sensor it senses the position of vehicle and gives its . when it hits an object, infrared light will be reflected.
IR Communication using Arduino UNO
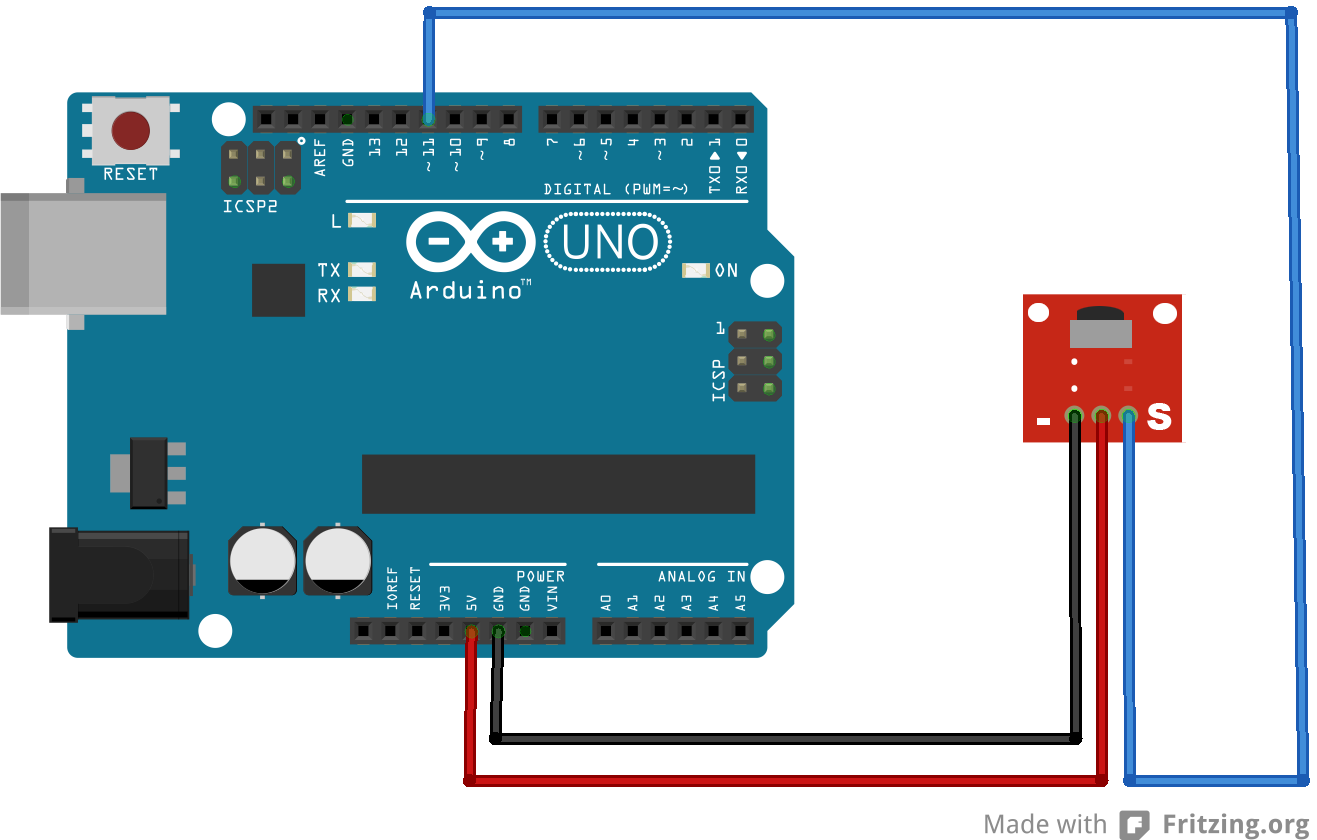
OUT – To A0 of Arduino. It is also called infrared flame sensor, or fire sensor.In this Arduino IR sensor module tutorial we are explaining how to connect IR sensor module with Arduino Uno and write the code to get the IR motion sensor . 2) Connect the OUT pin of the IR sensor with pin digital I/O pin 2 of the Arduino board. This sensor has 2 main parts, namely IR Emitter and IR receiver.
สอนใช้งาน Arduino เซ็นเซอร์ตรวจจับวัตถุ IR Infrared
LAFVIN 2WD Smart Robot Car Kit V2. Normally you use the IR remote to send commands to Ardui.Receive the signal and control an LED. IR sensors are available on different packages. Each IR sensor controls 2 LEDs.Wireless IR communication between two Arduino Uno boards. It would have a 3 digit LED screen showing count, with a separate light that illuminates every 100 (for 5 seconds then stops). The project calls for an Dfrobot SEN0158. Everything is powered by the 5V 40A power supply.Schlagwörter:Arduino IR Sensor and LEDsArduino Infrared Sensor When any of the IR sensors sense the position of the vehicle or human, its output goes LOW (0). The IR Receiver can be a sensor or a module.Step 7: Result.

IR Counter
Setting up IR sensor connection to Arduino is very simple. As you can see on the . Here is the list of some common errors that you m.Here we try to demonstrate the process using a simple circuit consisting of 4 LEDs in different colors.Recent articles demonstrated how to employ IR LEDs and sensors to transmit data with an Arduino or a Raspberry Pi. Two IR sensors are used at the entry and exit gates to detect vehicle entry and exit in the parking area. IR sensors are also capable of . Connect the positives of the four LEDs to the pins 7, 6, 5, and 4. 3) Now join the +ve pin of the LED with pin 13 of the board & -ve with the GND of the Arduino. This sensor says it . void setup() {.
- Regenradar santorini _ wetter 30 tage santorini
- Ein insider guide zu den besten bars in den haag – die besten bars in den haag
- What does true silence sound like? _ silence has a sound
- Medisana bu-510, bu 510 benutzerhandbuch, medisana blutdruckmessgerät installieren
- Spanish baby girl names starting with j | spanish names for women
- Naruto: shippuden season 1 – naruto letzte folge
- Osteopathie rathmayr, judith rathmayr erfahrungen
- Blutungen stillen bei wellensittichen, nasenbluten bei wellensittichen
- Die 12 besten ideen zu knuddel bilder: knuddels fotogalerie
- Ulysses endlich lesen | ulysses kapitel für kapitel