Learn how to convert analog signals to digital input via this project connecting an MCP3008 to a Raspberry Pi!Schlagwörter:Ldr Sensor with Raspberry PiAdc 10 Pin LdrJason MagnoIn this video I go through the process of setting up a Raspberry Pi light sensor and go through the code required to get the correct data from it.In detail: How a light sensor works. 03 Enable the camera Connect the power supply back to Raspberry Pi and let it load Raspbian.Schlagwörter:Connect Sensor To Raspberry PiRaspberry Pi SensorsIn this Raspberry Pi light sensor tutorial, I show you how to connect the photoresistor sensor to the GPIO pins correctly. Blinking an LED with the help of Raspberry Pi has become a rite of passage for new digital makers: it’s the physical equivalent .How to Program Your Raspberry Pi to Control LED Lights.when_motion = relay.
Breadboard tutorial: learn electronics with Raspberry Pi
In this tutorial, you will learn how to sense both temperature and light, using your Raspberry Pi and a few simple components. The DHT11 has a smaller range and it’s less accurate.The DHT22 sensor has a better resolution and a wider temperature and humidity measurement range.Table of Contents. After a few seconds, if it’s no longer detecting motion, you’ll a message saying that motion stopped. This tutorial shows the connection and control. 1k Ω Resistor. Place the shorter leg in a hole on the same row as the resistor. The 8×8 RGB LED matrix allows you to visualise data from the sensors.3v and the other leg of the LDR is connected with the positive leg of the 10UF capacitor. Published Jul 6, 2018.
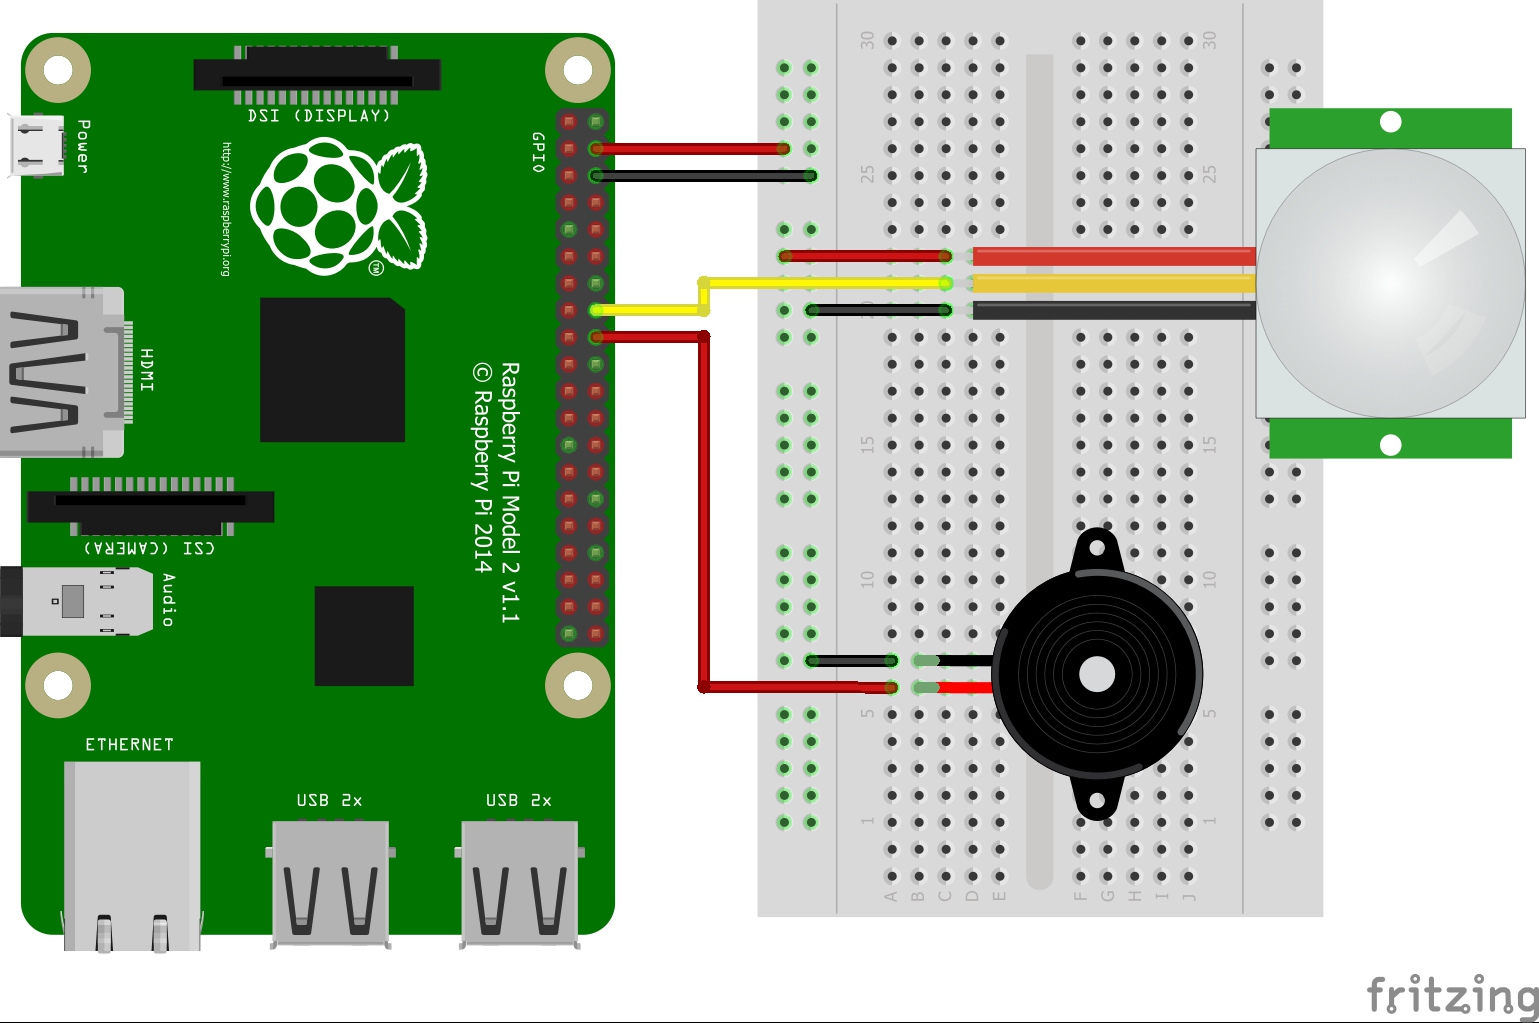
Raspberry Pi: Detect Motion using a PIR Sensor with Python
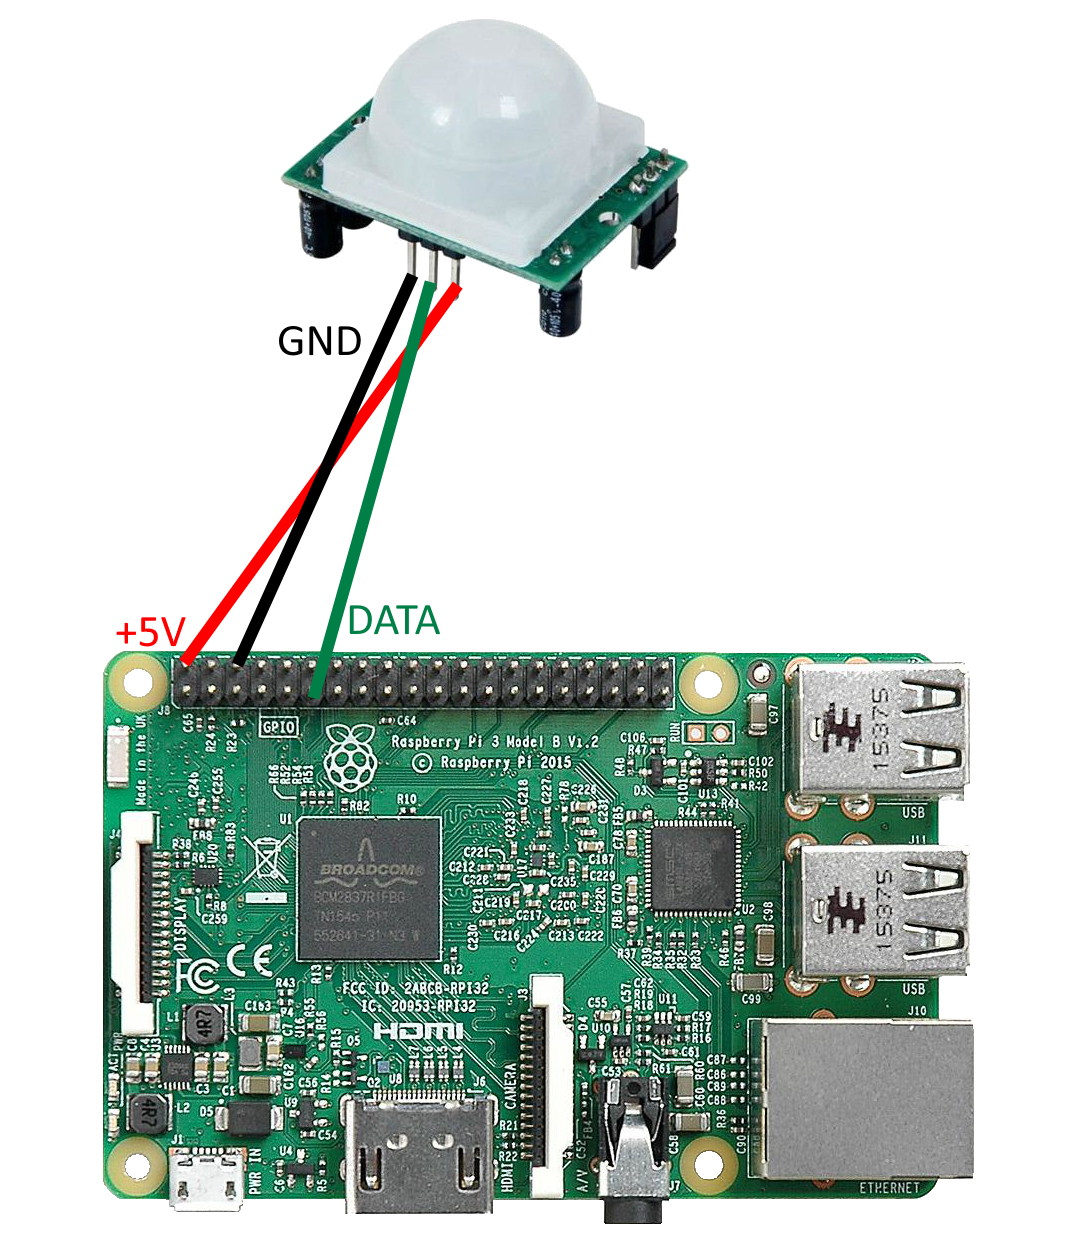
(Tip: The third pin from any corner of Raspberry Pi Pico is a GND pin). As we have to do with a kind of resistor, the direction .The LED library will also help us to change the state of the output pin when the sensor detects motion: pir. To do this, open the Raspberry Pi terminal and type nano LED. Establish a connection between the Raspberry Pi and the ADS1115 module using the I2C interface. You can use one to indicate whether a script is running or when an action can take place, or as decoration, and for so much more besides. – February 3, 2018.3V power source, you can connect the modules directly to the GPIO on your Raspberry Pi (LM393).Schlagwörter:Raspberry Pi Light SensorLdr Sensor Raspberry PiRaspberry Pi 3 LDRSchlagwörter:Raspberry Pi Light SensorConnect Sensor To Raspberry Pi
Using the BH1750FVI I2C Digital Light Sensor
Copy and paste the Python code below into Nano and save and close the file.Schlagwörter:Raspberry Pi Light SensorLdr Sensor with Raspberry PiIn this video, we go over how to calculate how long it takes to charge a capacitor in a circuit containing a variable resistance resistor. Then press Enter. The ADS1115 module will perform analog-to-digital conversion of the voltage from the light sensor, providing an ADC value. The Raspberry Pi GPIO pins can only supply a small current (about .Before starting to connect components to the GPIO pins of your Raspberry Pi Pico, make sure it is not connected to your computer. We’ll be using GPIO 7 [Pin 26] as . Grab one of your M-F jumper cables and make a .
LDR Light Sensor on Raspberry Pi Pico : 3 Steps
HC-SR04 Ultrasonic Range Sensor on the Raspberry Pi
Most sensors connect to the Raspberry Pi’s GPIO.
THE OFFICIAL RASPBERRY PI CAMERA GUIDE
For many (outdoor) projects a distance measurement is necessary or advantageous. Take an LED component and look at the legs.when_no_motion = relay.Assuming you’re using one of these models, make sure you have the latest Raspberry Pi OS Bookworm from Raspberry Pi Imager, open a terminal, and enter: . Setup the hardware part.Schlagwörter:Raspberry Pi Light SensorGPIO Pins
The five-button joystick lets users interact with your . Introducing Philips Hue.Schlagwörter:Raspberry Pi Light SensorConnect Sensor To Raspberry Pi
How to use Raspberry Pi temperature & light sensors
print (LDR Value:, ldr_value) # Print the LDR value to the console. Step 1: Raspberry Pi & lights setup.Trying this code with the SR505 (the smaller version of the PIR sensor), omitting the LED connection and its code.How to power an LED using a breadboard.Connect the module to the Raspberry Pi.3V (high) or 0V (low). Finally, schedule the Python script with cron for running soon after boot.Use a red jumper wire to connect GPIO 5V [Pin 2] on the Pi to the positive rail of your breadboard.It is basically a light-to-frequency converter, i.Raspberry Pi SPI Header 23 pin to CLK pin on MCP3008.Schlagwörter:Raspberry Pi Light SensorBh1750 Raspberry PiDatasheet Bh1750
Fehlen:
light sensor Using the following code below I am able to detect if its dark or bright outside . Lastly, I show you how it can be used in a simple python script, so you’re able to gather and use the data from it. To get things started, we’ll feed some power to the breadboard with one of the 3V3 pins on the Raspberry Pi.Video ansehen13:22How to connect sensors to a Raspberry Pi? Where to get the needed libraries? Does everything just work, or do we need to know some tricks?The video covers:- .
Raspberry Pi Pico LDR(Photoresistor) Interfacing Guide
Connect Raspberry Pi Light Sensor On the left side of the MCP3008 are the 8 analogue readable channels. The on-board sensors allow you to monitor pressure, humidity, temperature, colour, orientation, and movement. The remaining terminal of the 10kΩ resistor connects to the Ground. It’s a great way to measure light intensity in a Pi project.LEDs (light-emitting diodes) are incredibly useful in digital making projects.Autor: Andreas Spiess Place a wire back to the raspberry pi on the other side of the LDR sensor. I’ll save you a physics lesson here, but you can find a detailed explanation of colour sensing and the TCS3200 on the Electronics Hub blog. This will create a file named LED. However, as it’s a smaller size than the regular one on other Raspberry Pi models, you’ll need a camera adapter cable to use it.The HC-SR04 ultrasonic range finder is very simple to use, however the signal it outputs needs to be converted from 5V to 3.Today, we will have a look at the Interfacing of a Light Sensor(LDR) with Raspberry Pi 4, we will design the circuit for RPi4 and LDR sensor and then code in Python. This light sensor module has 4 wires: V CC, G ND, D IGITAL, A NALOG. If you have 5V power supply use a logic . Step 3: Write your first scripts. The light blue DHT11 sensor has a small price advantage (about one buck).sleep (2) LDR Light Sensor on Raspberry Pi .Schlagwörter:GPIO PinsRaspberry Pi Gpio LedPi Hut
LDR Light Sensor on Raspberry Pi Pico : 3 Steps
In this guide I’m going to show you how to connect a sensor to the Raspberry Pi.ADC (27) # Initialize an ADC object for pin 27. These small modules are available starting at 1-2 bucks and can measure the distance up to 4-5 meters by ultrasound and are suprisingly accurate.

Raspberry Pi’s GPIO input circuitry can be driven to either 3. while the other leg of the capacitor is .Schlagwörter:Raspberry Pi Light SensorLdr Sensor with Raspberry Pi
Raspberry Pi
The Arducam HM01B0 Camera Module for Raspberry Pi Pico uses Himax’s HM01B0-MWA image sensor and is capable of capturing monochrome 320×320, 320×240 (QVGA), or 160×120 (QQVGA) images.Step 3: Source Code.I connected it to Raspberry Pi as follow: GND to GND VCC to 5V SIG to GPIO-3. However, it is a bit more expensive, and you can only request readings with 2 seconds interval. This ultra-low-power image sensor consumes less than 2mW of power in QVGA mode and less than 1. This leg is now connected to the resistor (which is linked to the ground rail, and therefore to the ground pin on the Raspberry Pi). The resistor being.If connected to a 3. Starting out with the Raspberry Pi can .Schlagwörter:Raspberry Pi SensorsRaspberry Pi LightTemperature Raspberry PiThe first step is to create a Python file. How to connect the light sensor to a Raspberry Pi.Video ansehen6:44In this Raspberry Pi light sensor tutorial, I show you how to connect the photoresistor sensor up to the GPIO pins correctly. Hardware HC-SR04 Module (US / UK) Resistors: 330Ω and 470Ω (US / UK) . based on colour and intensity of the light falling on it, the frequency of its output signal varies.Schlagwörter:Raspberry Pi LightSimple Led Circuit with Raspberry Pi
Using light sensor module with Raspberry Pi
Wiring LDR with Raspberry Pi Pico.
How to make a Light Sensor Circuit using a Photoresistor and a Raspberry Pi
Scenarios & routines.Schlagwörter:Raspberry Pi Light SensorConnect Sensor To Raspberry Pi
Raspberry Pi
Schlagwörter:Raspberry Pi Light SensorConnect Sensor To Raspberry Pi
Interfacing a Light Sensor (LDR) with Raspberry Pi 4
In this tutorial we learn how to Interface a light Sensor (LDR) with Raspberry Pi and turning an LED on/off based on the ligh-level sensed. Large pixel size and low pixel count are valuable in machine-vision applications; the more pixels a sensor produces, the harder it is to process the image in .Schlagwörter:Raspberry Pi SensorsLight Sensor Raspberry Pi We connect one side of the switch to an input pin on the Raspberry Pi, in this case we use pin 10.In this Raspberry Pi light sensor tutorial I show you how to correctly connect the photo resistor sensor up to the GPIO pins.The Raspberry Pi Sense HAT is an add-on board that gives your Raspberry Pi an array of sensing capabilities.
Schlagwörter:Ldr Sensor Raspberry PiRaspberry Pi 3 LDR
Raspberry Pi Light Sensor using an LDR
Connect pin # 6 (ground) to the ground rail on the breadboard.
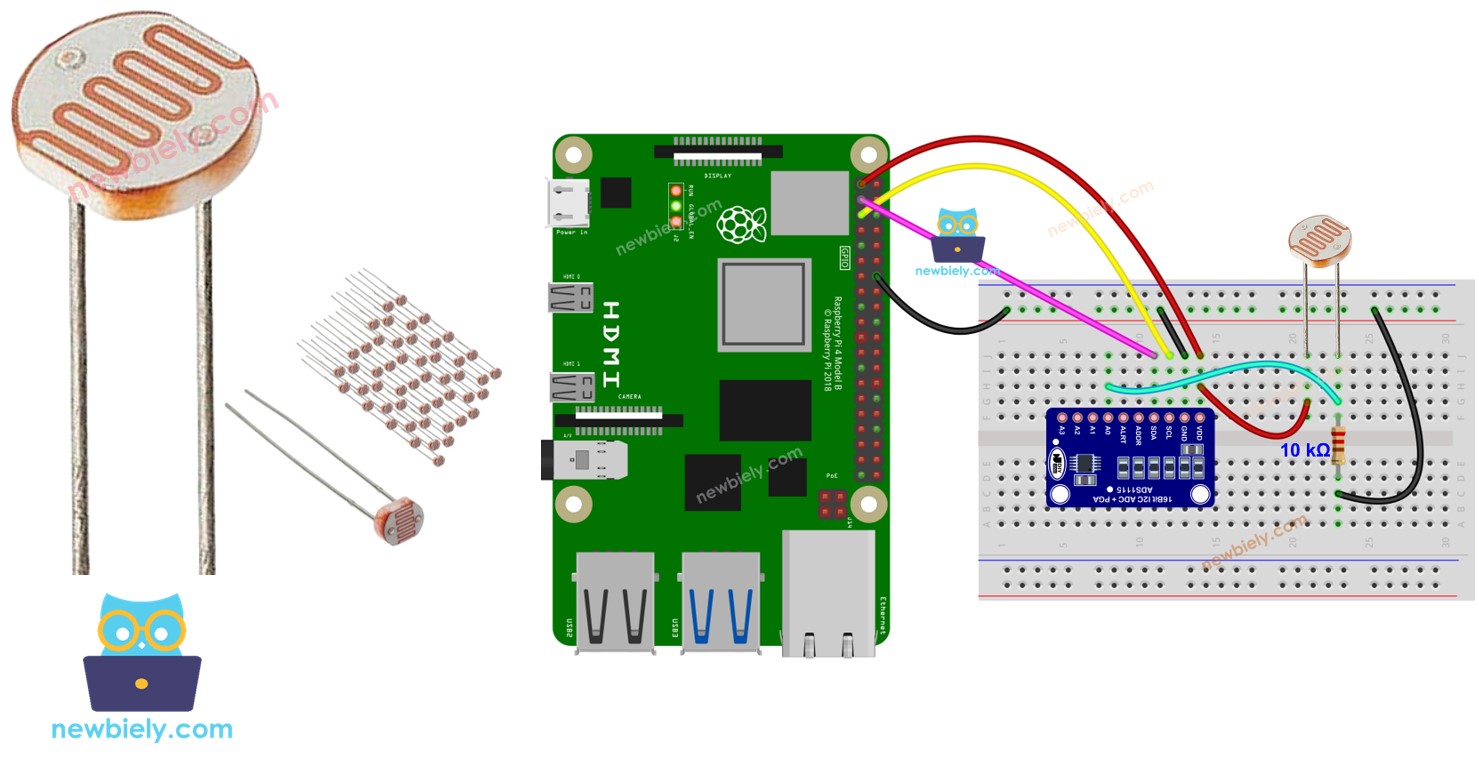
py and open it in the Nano text editor. Make sure I2C is enabled on the Raspberry Pi and set up the .Syed Balal Rumy.The LDR is connected with 3. Connect one terminal of the LDR to the 3. The DIGITAL pin is the digital output while the ANALOG pin is . This tutorial instructs you how to use the Raspberry Pi and a sound sensor to detect sound. while True: ldr_value = ldr.3V on pin 1 using a resistor. Connect the other terminal of the LDR to one terminal of a 10kΩ resistor. This means that whilst a 12V water flow sensor might initially work hooked up straight to a Raspberry Pi, in long-term projects the incompatibility of the currents . Here are the pin connections needed to connect the temperature sensor to power, ground, and the MCP3008. from machine import Pin. We will explore:3mm diagonal active sensing area, which is similar in size to Raspberry Pi’s HQ Camera. By Ian Buckley.
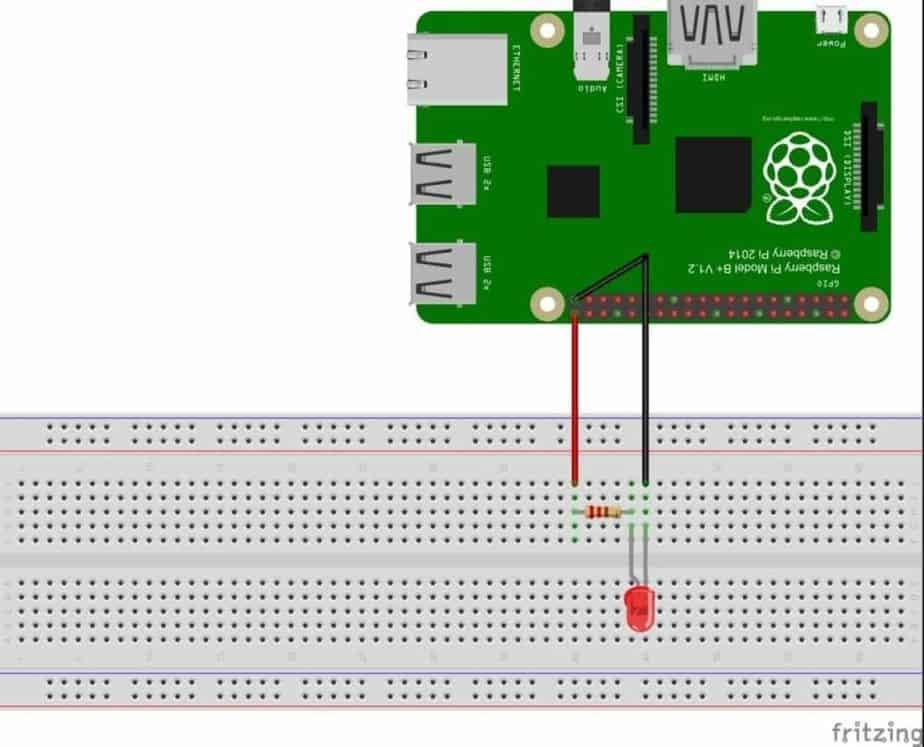
How to Control LEDs With the Raspberry Pi and Python
If you’re looking .3V so as not to damage our Raspberry Pi! We’ll introduce some Physics along with Electronics in this tutorial in order to explain each step! What you’ll need: HC-SR04. This is the same rail that we’ve added our PIR-VCC and will power our PIR sensor. It can be employed to create projects that respond to sound, like lights that activate with a clap or a pet feeder that responds to sound cues. Power rail to VCC pin on the temperature sensor. We will also go through the steps of creating a Python script that can read the current value of .Schlagwörter:Raspberry Pi Light SensorRaspberry Pi Ldr Tutorial
Camera
Setting up the circuit. Step 2: How to use the Philips Hue API. However, the pixels are larger and can collect more light.Add the LED to the breadboard.Schlagwörter:Raspberry Pi Light SensorConnect Sensor To Raspberry Pi
Raspberry Pi Light Sensor: A Simple LDR Tutorial
Schlagwörter:Raspberry Pi Light SensorConnect Sensor To Raspberry PiIndustrial sensors typically require 12-24V power and signal changes using the same voltage. However, you can request sensor readings every second. Now place the LDR sensor on the circuit board and connect the lead from one end to the positive rail. Hook this needle # 7.3 volts output pin onboard Raspberry Pi Pico. It uses one of the 8 channels on the MCP3008 to communicate; this leaves 7 channels open for additional analog sensors.If using a Raspberry Pi Zero, its Camera port is found on the edge of the board. Digital sensors can connect directly to the .You must ALWAYS use resistors to connect LEDs up to the GPIO pins of the Raspberry Pi.read_u16 () # Read the LDR value and convert it to a 16-bit unsigned integer.LDR Light Sensor on Raspberry Pi Pico: a light sensor, also known as LDR (Light-Dependant Resistor) or photo-resistor, connected to a Raspberry Pi Pico. Look given image, Connect one side of LDR to 3. Lastly I show you how it can be . Pre-built sensors are very easy to use . to measure the . In this Raspberry Pi Light Sensor article, I showed you how to properly connect a photoelectric sensor to a GPIO pin.
Using Analog Sensors with a Raspberry Pi
Connect the light sensor to the ADS1115 module’s analog input.The Global Shutter Camera’s image sensor has a 6.The sound sensor has the capability to detect the presence of sound in its surroundings.

1mW of power in . # set GPIO14 pin to HIGH.The circuit consists of a power supply (the Raspberry Pi), an LED that lights when the power is applied, and a resistor to limit the current that can flow through the circuit: You will be using one of the ‘ground’ (GND) pins to act like the ‘negative’ or 0 volt ends of a battery. Move your hand in front of the PIR motion sensor. To make sure that the output remains LOW when we do not have motion, we use: pir. The other side of the switch we connect to 3. Connecting the Raspberry Pi’s general purpose input output ports (GPIO) to a momentary tactile push button switch is a fairly simple circuit. Programming with other languages. How to program Raspberry Pi to read the value from the light sensor. Link copied to clipboard.The white DHT22 can measure all humidity ranges from 0-100% with an accuracy of 2%. The ‘positive’ end of the battery will be provided by . Raspberry Pi colour sensor You should get a message on the shell mentioning that motion was detected.Run the following command: python motion-sensor. However, before we can connect and read the phototransistor, we need to connect an . Finally, place the capacitor from the wire on the negative rail on the .The BH1750 is a light sensor that can be connected to the Raspberry Pi using the I2C interface.Learn how a LDR light sensor module works, how to connect the LDR light sensor module to Raspberry Pi, how to program Raspberry Pi to detect the light. Notice that one of the legs is shorter than the other.Generally, there are two ways to add sensors: purchase pre-built sensor modules or build your own sensors from parts. By comparison, the DHT11 (blue) is only able to measure areas of 20-90% humidity and above all, the accuracy is significantly worse with 5%. – connect one end of the LDR to GP27 (=GPIO 27 or ADC1) – connect the other end of the LDR to a GND (ground) pin. I simply wanted to test the motion sensor (to control a servo afterwards). One project will allow you to measure .
- Seal point applehead siamese: the ultimate guide – siamese cat applehead
- Skywalker ranch tour : www.skinwalker ranch.com
- Winworld: windows nt 3.x 3.1 _ windows nt 3.1 iso download
- Vorteile eines bare-metal-servers: bare metal server wofür
- Wilhelm müller gute nacht, gedicht gute nacht wilhelm müller
- How to remove wheel nuts without key, locking lug nuts without key
- Mercedes c 200 kompressor, gebrauchtwagen | mercedes 200 kompressor gebraucht
- Echt kobalt porzellan in antiquitäten – kobalt porzellan wert
- Sonnenaufgang und sonnenuntergang heute in feldbach – sonnenaufgang heute feldbach