Part your hair down the middle. Now that you’ve created two french braids, and secured them with clear elastics, it’s time to pin your hair into that faux milkmaid braid look. At this point you should have reached the nape of your neck.For a thicker braid, gently pull the braid open to create more volume.The intricate hairstyle has become increasingly popular on the red carpet.
How to Rock a Dutch Braid This Season
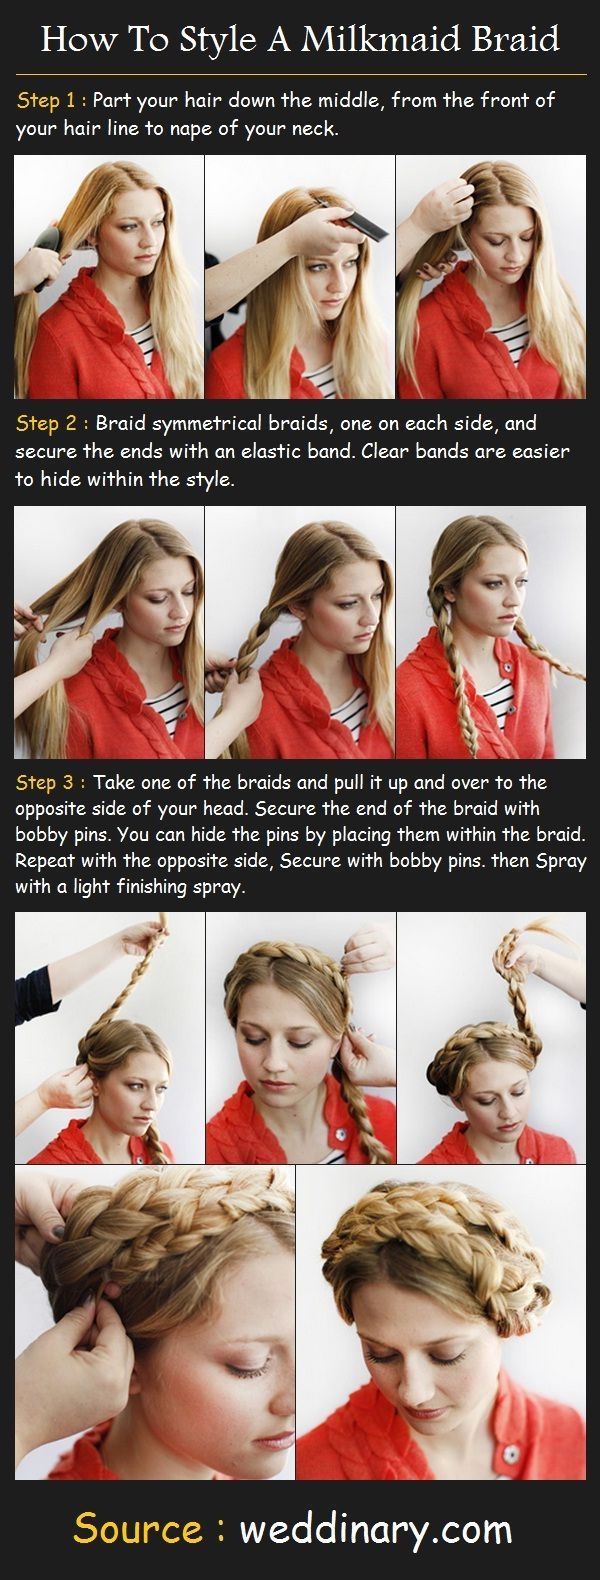
Messy milkmaid fishtail plait: Step-by-step guide
Today, I’m going to show you how to do a milkmaid braid, a traditional braided hairstyle that is perfect for the holiday season. Step 7: Take both braided pigtails and place over the crown of . I have quite long hair though and could never follow the normal tutorials on how to do it without the braids looking really bulky on the top of my head. For a neater finish, leave braids as is. Starting on one side, create a regular three-strand braid, braiding to the .Autor: Rachel Maksy Step three: Continue making a fishtail braid down to the ends of your hair.Autor: Loepsie
The Only Milkmaid Braid Tutorial You’ll Ever Need
I think Heidi braids are so cute and, besides the .
Milk Maid Braid
Place one braid across the top of your head. Take the next braid and . Cop this cute boho-chic look in a few easy steps. Step 5: Create your bun. This will create a little “hump” at the base of the braid by your ears, but you can secure that later with bobby pins. Secure each braid .Please let me know if you have any more questions in the comments belo. Tie off with an elastic.Surprisingly simple, milkmaid braids are a darling look year around.Step 1 / Begin by parting the hair where you normally prefer. Loosen the braids: Gently pull at sections of the braids to loosen them, achieving a softer and more relaxed look.
Messy Fishtail Milkmaid Braids
Video ansehen4:12In this quick little tutorial I’m going to show you how you can do milkmaid braids in a way that you don’t get a parting in the back.

I am finally back with a new video!This time I am showing you how I do milkmaid braids.DIY Braid Step 2 of 4: French-braid hair on either side of part.Geschätzte Lesezeit: 40 Sekunden
How to Create DIY Milkmaid Braids
Some women don’t like having a bare forehead with milkmaid braid hairstyles. Then pin it the end of the braid just behind your ear, hiding it behind the other braid. Then, braid the other side. Keep the braid as tight as possible.Video ansehen10:02How to Create a Diamond Infinity Braid (ft Brooklyn from BrooklynAndBailey) by Mindy McKnight. Do the same on with your second braid.Create braids by taking left hand with pointer finger and thumb, then grab the left section, leave middle strand free, then with right hand use thumb and index finger to hold on to right sections .
EASY Milkmaid/Crown Braided Updo
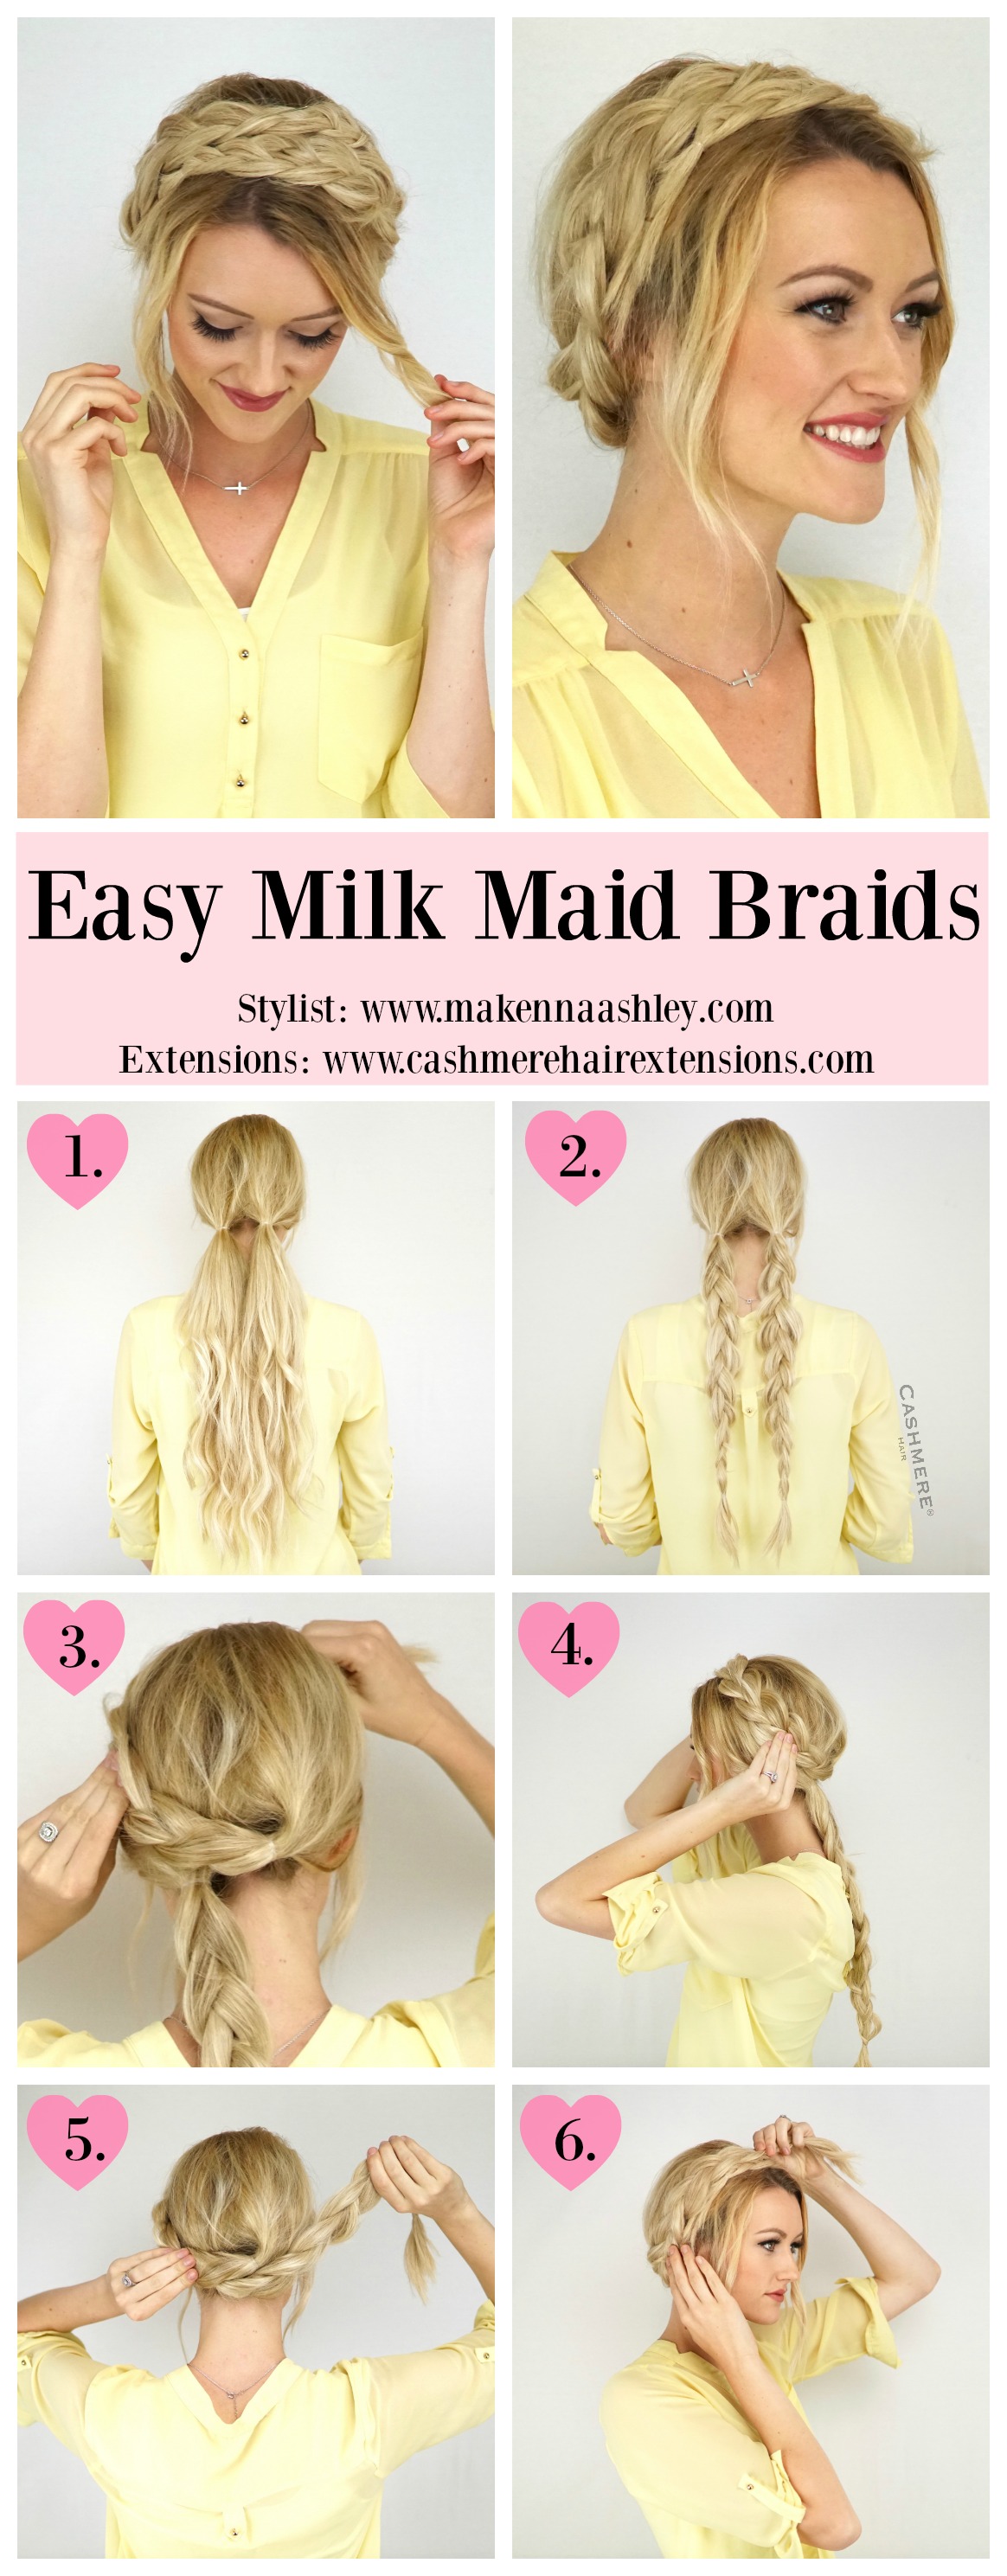
After adding your braids, wrap the ends of your hair into a chic bun.How to achieve a MilkMaid Braid/Up-DoThis was really highly requested after my video with Marcus!Click thumbs up if it was helpful & leave more hair style su. Step One – Create Two Pigtail Braids.
Watch: how to Five minute easy milkmaid braid tutorial
Step 4: Add accent braids.Hey Guys,Today I am going to show you all How I creates #Milkmaidbraids #DIY ! Learn how to do this easy & cute milkmaid braids!! If you try it out, post on . Brush your hair and make a center part all the down the back of your head, creating two pigtails on either side.
In this video, you will learn how to fishtail braid for complete beginners!TOOLS & PRODUCTS I USE // (Affiliate Links Below – Disclaimer at the bottom of the. Use as many pins as it takes! Work from the tip of your braid and pin all the way to the base of the pigtail.Drop the right-hand section and then gather it back up with a small section of the loose hair.Easy Heidi Braids is a great way to create a crown braid without any French or Dutch braiding! It also works well for shorter hair too! My hair was a little bit dirty and I didn’t feel like dutch braiding all my hair around my head so it became the perfect opportunity for some Heidi Braids.Pull each braid up to create the crown of the milkmaid hairstyle. A romanic hairstyle hair deserves something soft and warm, like peachy tones inspired by this Tom Ford Bitter Peach Palette.How to achieve a MilkMaid Braid/Up-Do This was really highly requested after my video with Marcus! Click thumbs up if it was helpful & leave more hair style . Step four: Repeat on the other side of your head, making a simple fishtail braid and tying off . Today, Brooklyn is going to show y’all how she creates her #DIY Milkmaid Braids!.
French-braid each side back, toward the lower center of the head (just above the . All you’re going to do is bring one braid around your head and under the other. Learn how to do milkmaid braids in this step-by-step tutorial.Now, you’re ready to get started.An easy braided updo.
How To Create Milk Maid Braids
Milkmaid Braid Tutorial.

Secure it with bobby pins every few inches down the plait.For this tutorial I will be showing you how to create a french braid style crown braid, done with a milkmaid twist. Step 2 / Divide off a section of hair at the crown, twist it together .Here’s the only milkmaid braid tutorial you’ll need, but first a little glam. Braided Hairstyle. Step 3: Braid the other braid adding the other half of the .Want to learn how to create a quick and cute milkmaid braid hairstyle? We’ll teach you with this easy milkmaid braid tutorial!It may look difficult, but follow this easy milkmaid braid tutorial and you’ll have an intricate looking hairstyle in no time at all, step by step.Video ansehen5:44A few of you requested this hairstyle tutorial so here ya go!! So so easy, and one of my favorite styles to do!! I love you all!IG: https://www. Step 1: Part your hair down the middle.Milkmaid Braids DIY. You can add as many or as few as you like and then pull them apart to add texture. Create a deep side part that’s not too perfect.Today I’m giving step by step instructions on how to create this fishtail/dutch milk maid braids that have been on my Instagram (@julianna_claire) and . I’m putting mine on the right side.
Milkmaid Braids DIY
To create your bun and braids updo, add a few accent braids to the length of your ponytail. That tutorial is for when we nail this one and level up!You’ll now need to secure the fishtail plaits across your head to create the a milkmaid braid effect. bikepretty, bike pretty, cycle style, cycle chic, bike model, girl on bike, bike fashion .
20 Milkmaid Braid Hairstyles to Get Boho Chic Look
Here’s how to style a milkmaid braid at home. I love how this braided hairstyle can be . If the braid feels loose, then add some more pins.How To Make A 16th Or 17th C. Maybe it’s Rosalie’s gorgeous purple hair that .Geschätzte Lesezeit: 3 min
Milkmaid Braids With No Parting
These milkmaid braids are really easy (seriously, you can totally do this)! I love that I feel like I put in the effort and got ready for the day and this style keeps my hair out of my face while working or .This is a guide on no-part milkmaid braids.This Milkmaid braided updo is created with two dutch braids, making it perfect for short, medium, and long hair lengths. Step 6: Braid the next section of hair repeat steps 1 to 5. 6 Secure your milkmaid braid in place. Let the loose tresses form a wavy texture and secure some of them at the back of your head.Repeat on the other side, taking a small section of hair on your right side and crossing it over to your left. Braid one side to make a traditional pigtail. Check out more fun, summer hair accessory inspiration on the Prose blog: .Wrap one braid across the top of your head, like where you would place a headband.Secure each end with bobby pins, creating the classic milkmaid braid style. In this case, get some long bangs that cover . By doing it this way you won’t have those odd bumps that usually show up on one . Start braiding on one side of your head with the braid leading . Part your hair in two down the middle, keeping the front two wispy pieces in the front of your face out.Please Subscribe!A Milkmaid braid is a great hairstyle for getting all your hair out of your face and it’s the perfect hair look for dates or gatherings. Take your left plait and place it across the top of your head near the front, just behind your loose sections of hair that you pulled out. Instead of putting both braids on the top, instead I create a complete circle of braids . I have loved milkmaid braids ever since I saw Heidi when I was like ten.This milkmaid braid becomes more formal when you erase the deep part going down the back and add delicate fringe around the face. Keep doing this right then left, trying to keep the additional gathered sections of loose hair as even as possible, until all of the loose hair has been gathered.Create the braid a few inches back from your hairline and leave the rest of your tresses loose.
Modern Milkmaid Braids Hairstyle Tutorial

Part your hair down the middle and separate into 2 sections. Repeat for the left side.A twist on a classic milkmaid braid, this loose version has a more modern feel and you can try it in your own hair with this tutorial. Enjoy watching!—–.I’ve discovered a few secrets to mastering the milkmaid braid and of course I’m going to share them with you in this simple step-by-step tutorial First, you need the right tools.
Easy Heidi Braids
Ashley Streicher, Joanne’s stylist on Sunday, wanted to create a .
How to Milkmaid Braid Your Hair: Tutorial
Braid the hair adding one half of the ribbon to one strand of the braid. Make sure your hair . Complete a 3 strand braid (starting at the bottom of the ear) on each section of hair.Please let me know if you have any more questions in the comments . Here are the 4 steps to the perfect milkmaid braid.Step 2: Milkmaid Braids.Video ansehen6:20Hey, Guys! (WATCH IN HD) Here is a quick hair tutorial! I posted a picture wearing these braids on Instagram and it was HIGHLY requested! Super easy and cute for spring & summer!Autor: KathleenLights
Milkmaid Braid Tutorial
ewaplewa123/Instagram .
How To: Milkmaid Braids
Creating milkmaid crown Cross the tails at the top of your head in the front and tuck the end of each braid underneath the other braid with the help of a few bobby pins. Keep in mind we’re not creating a halo braid that goes all the way around. We’ll be using a three-strand braid, but you can . Secure each braid with an .Check out more fun, summer hair accessory inspiration on the Prose blog: https://pros. We’re happy to give you the scoop on how to achieve the look, step-by-step.Autor: Mindy McKnight
A step-by-step guide to creating a milkmaid braid
I go towards my back with the braid and twist it up). Secure any loose ends : Your hair is layered, so we’re not surprised that there are spikes sticking out left, right and center.A step-by-step guide to recreating the popular crown plait known as the milkmaid braid.
Tutorial: How to Create the Milkmaid Braid in Less than 15 Minutes
Pin in place and tuck the ends of each braid in and pin.Learn how to create a simple milkmaid braid with a fun summer accessory. Shake your head around a bit. Step 2: Secure the braid as in the picture: Form two or three loops with the ribbon and draw them tight round the braid. If your hair is slightly short, lift your ponytail as you braid to get an extra inch or so.
- Can hypothyroidism cause acne and serious hormonal imbalances? – does acne affect thyroid
- H/k 3550 sendersuche, harman/kardon: harman kardon hk 3550 test
- Gut bio bio-tomatensauce 350 ml – tomatensauce aldi süd
- Résultats de la flèche wallonne femmes 2024: fleche wallonne femmes
- Les 10 bienfaits prouvés de la rhodiola, rhodiola 500 mg
- Efectos químicos de la corriente eléctrica, qué es una corriente eléctrica
- Fujinon xf23mm 1.4 r _ fujifilm xf23 abmessungen
- Yamaha xt 600 3tb, motorrad gebraucht kaufen – yamaha xt 600 preis
- About: the matrix | matrix film deutsch
- Aktionswoche 2024 alkohol – dhs factsheet alkohol