This guide shows how to use the NEO-6M GPS module with the Arduino to get GPS data. Apart from longitude, latitude, and altitude, Arduino Nano is also able to . The GPS receiver obtains the data as a whole NMEA format text. But this module is not breadboarded friendly neither it has a soldered antenna.Schlagwörter:GPS To ArduinoNeo-6M Gps Module ArduinoInterface Gps
A9G GMS/GPS and Arduino Mega
To make it easy for people to help you please modify .This document shows how to interface the SIM800L with Arduino.
Build a Car Tracking System with the SIM808 Module
So simply I soldered few 2.The Neo-6M GPS module is a variant of the GPS receivers supplied by u-Blox. GPS RX need not to be connected. The neo-6m GPS module is a GPS receiver that can be used to track the location of a .How to Interface GPS Module (NEO-6m) With Arduino: In this project, I have shown how to interface a GPS module with Arduino UNO. The NEO-6M module can smoothly track up to 22 satellites using over 50 channels.
SIM7600 4G GSM with Arduino
List Of Materials: -SIM800L with Arduino. MPU6050 Project 1: MPU6050 Project 2: FAQs About The MPU6050 .We carry a few different GPS modules here in the Adafruit shop, but none that satisfied our every desire – that’s why we designed this little GPS breakout board. Arduino read the data serially from . It’s got everything you want and more. The Library Manager will open. If your MPU 6050 module has a 5V pin, then you can connect it to your Arduino’s 5V pin. We believe this is the Ultimate GPS module, so we named it that. They are access as Serial, Serial1, Serial2, and Serial3.How to interface a GPS module (NEO-6M) with Arduino Mega. Connect Tx (Transmitter Pin) of GPS module to D4 Pin of Uno. This guide will teach you how to wire it up to a computer or an Arduino, and . Open the Tools menu (from the top menu bar) Look for Manage Libraries on the Tools menu, and click on it.Interfacing sim800 / sim900A GSM module with Arduino.The HC-06 Bluetooth module is permanently configured to be slave and is always in AT mode when not paired to any other device.

The NEO-6M GPS module, made by u-blox, is a small and portable device that is a key part of GPS systems. Plug two 4G-GSM antennas into the main antenna interface and auxiliary one.I’m now using the sample sketches with Ultimate GPS.Schlagwörter:GPS To ArduinoGps Module with ArduinoInterface Gps
Tutorial to Communicate Neo-6M GPS to Arduino
Um die Koordinaten deines Standorts herauszufinden, benötigst du nur einen Arduino, das GPS Modul NEO-6M * und ein paar Zeilen Code.Arduino Mega 2560 Ublox Neo 6m GPS module MPU 6050 accelerometer LCD TFT 2. This ‚emulates‘ a simple 4 connector generic GPS board hookup to the hardware serial pins on the Mega. If you want to use one of the Software Serial codes, be aware that many require using pins with PCINT capability, so not all Mega pins will work. Erfahre in diesem Tutorial, wie du dieses Modul richtig anschließt und . VCC: Powers the module, which can be connected directly to the .I’m using a Arduino mega 256 and a GT-U7 gps module, I’ve been trying to get the thing working for the past 2 weeks.Interfaced GPS receiver module with Arduino UNO and display the Time, Latitude, Longitude, and Altitude info on the Serial window.
Fehlen:
mega
DIY GPS device using Arduino Mega #Arduino #DIY
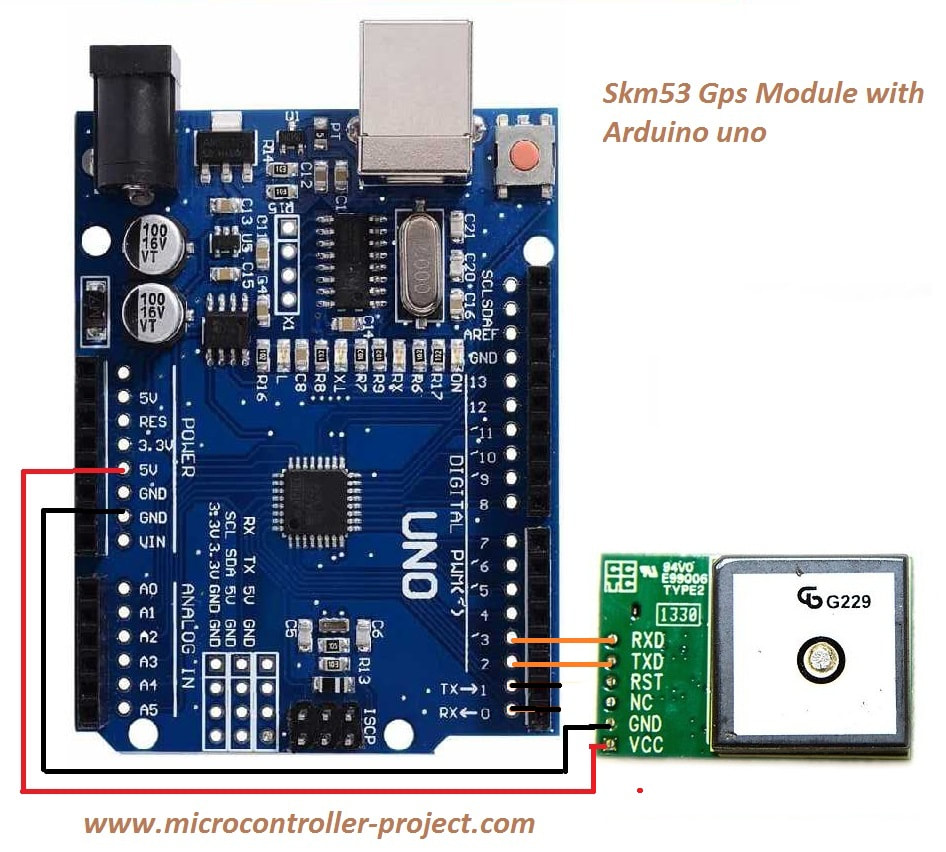
TX: This pin sends data out from the GPS module. As we are using the analog output, in this case, DOUT will be left as it is. Then the GSM module sends SMS to the number specified in . Its small dimensions and its low power consumption allow for the implementation in battery powered devices such as mobile phones, GPS modules or watches. However I never see any GPS . GPS stands for Global Positioning System and can be used to determine position, time, and speed if .Geschätzte Lesezeit: 10 minNEO-6M GPS Module Pinout. Try the test code and post the results.Arduino Lektion 35: GPS Modul NEO-6M. GND: This is the ground pin, which you connect to the negative side of the power source.The MPU 6050 is connected to Arduino as shown in the following diagram.Schlagwörter:GPS To ArduinoGps with Arduino MegaArduino Gps Lcd
How to interface arduino mega 2560 with skg13c gps module
RxD (Receiver): Used for serial communication. Step 4: Connect the 5 V line.4 With Touch Screen.7V and 820mAh battery through the VBat connector of the module and I have connected the grounds of the module and Arduino. SIM808 is a quad-band GSM/GPRS module that works on frequencies GSM 850MHz, EGSM 900MHz, DCS 1800MHz, and PCS 1900MHz.
Fehlen:
mega
Arduino
How to Interface GPS Module (NEO-6m) With Arduino: In this project, I have shown how to interface a GPS module with Arduino UNO. Das GPS Modul NEO-6M verfügt über eine externe Keramikantenne und hat minimale Abmaße, dadurch lassen sich kleine Projekte mit dem GPS Modul durchführen.BMP280 Pressure Sensor Features.

Using SIM7600 GSM GPS 4G LTE with Arduino.How to Interface GPS Module (NEO-6m) with Arduino. Open Arduino IDE and go to Tools, then Serial Monitor. Interface and working of GPS receiver using Arduino. It can be easily interfaced with Arduino Mega using the following steps.Schlagwörter:GPS To ArduinoGps Module with Arduino
Interfacing GPS model (GY-neo6mv2) with arduino mega
TxD (Transmitter): Used for serial communication. Supports External wakeup feature. The BMP280 barometric pressure module is a tiny sensor to measure barometric pressure. The data for longitude and latitude is . You are ready to use the modified Adafruit parsing sketch or whatever. In this project we aims to find out the coordinates of a place using GPS.Schlagwörter:GPS To ArduinoGPS Module with ArduinoSchlagwörter:GPS To ArduinoGps Module with ArduinoNeo-6M Gps Module ArduinoGY-NEO-7M module is an advanced GPS module that supports UART communication protocol with active antenna. I have used the following program: //Begin serial communication with Arduino and .The NEO 6M GPS module is a small device that helps in finding the location. The Arduino Mega interfaces with a GPS module to receive precise location data including latitude, longitude, and altitude, enabling applications in navigation, tracking, and geographic information systems (GIS). All you need is an Arduino, a GPS sensor, an LCD, and a few easily .Schlagwörter:GPS To ArduinoGPS Module with ArduinoInterface Gps
Open your Arduino IDE.Interfacing SX1278 LoRa Module with Arduino.54″ male connector to make it breadboard friendly.Schlagwörter:Global Positioning SystemGps DevicesGps Navigation
How to Interface Arduino with NEO 6M GPS Module?
I have my TX and RX pins connected directly to the RX and TX pins on the mega ( 0 & 1). In detail, we will learn: How to program Arduino Nano to calculate the distance from the current GPS position to a predefined GPS coordinate (e.
GPS and Compass Mega 2560
How To Use An MPU6050 With Arduino
The LoRa module that I am using here is the SX1278 Ra-02 which operates on 433MHz. Only the latitude and longitude coordinates are taken from it; using the Arduino TinyGPS library. This tutorial instructs you how to use Arduino Nano with a NEO-6M GPS module. Here we are using GPS module and Arduino Uno. It has low power consumption and drains the battery sparingly by consuming only 45mA of current.Arduino Nano – GPS.Step 7: Schematic. The Neo-6M receiver has the following features. You can interface this module easily with any microcontroller. The key features are: Pressure range: 300 to 1100 . I got it working once and it gave me accurate data but now when i try testing it, it won’t get past an example from the TinyGPSPlus library. Use the filter (search) box to look for . Arduino MPU 6050 connections. Set the Baud rate to 9600 and the ‚line ending‘ to ‚Both NL and CR‘.Step 3: Interface GPS Module With Arduino Uno. I can see on the serial output the text sent by the Arduino (Mega in my case). Type in ‚AT‘ without the quotes and click send. Additionally, we will connect the analog pin with the A0 of the Arduino UNO.
Arduino Nano
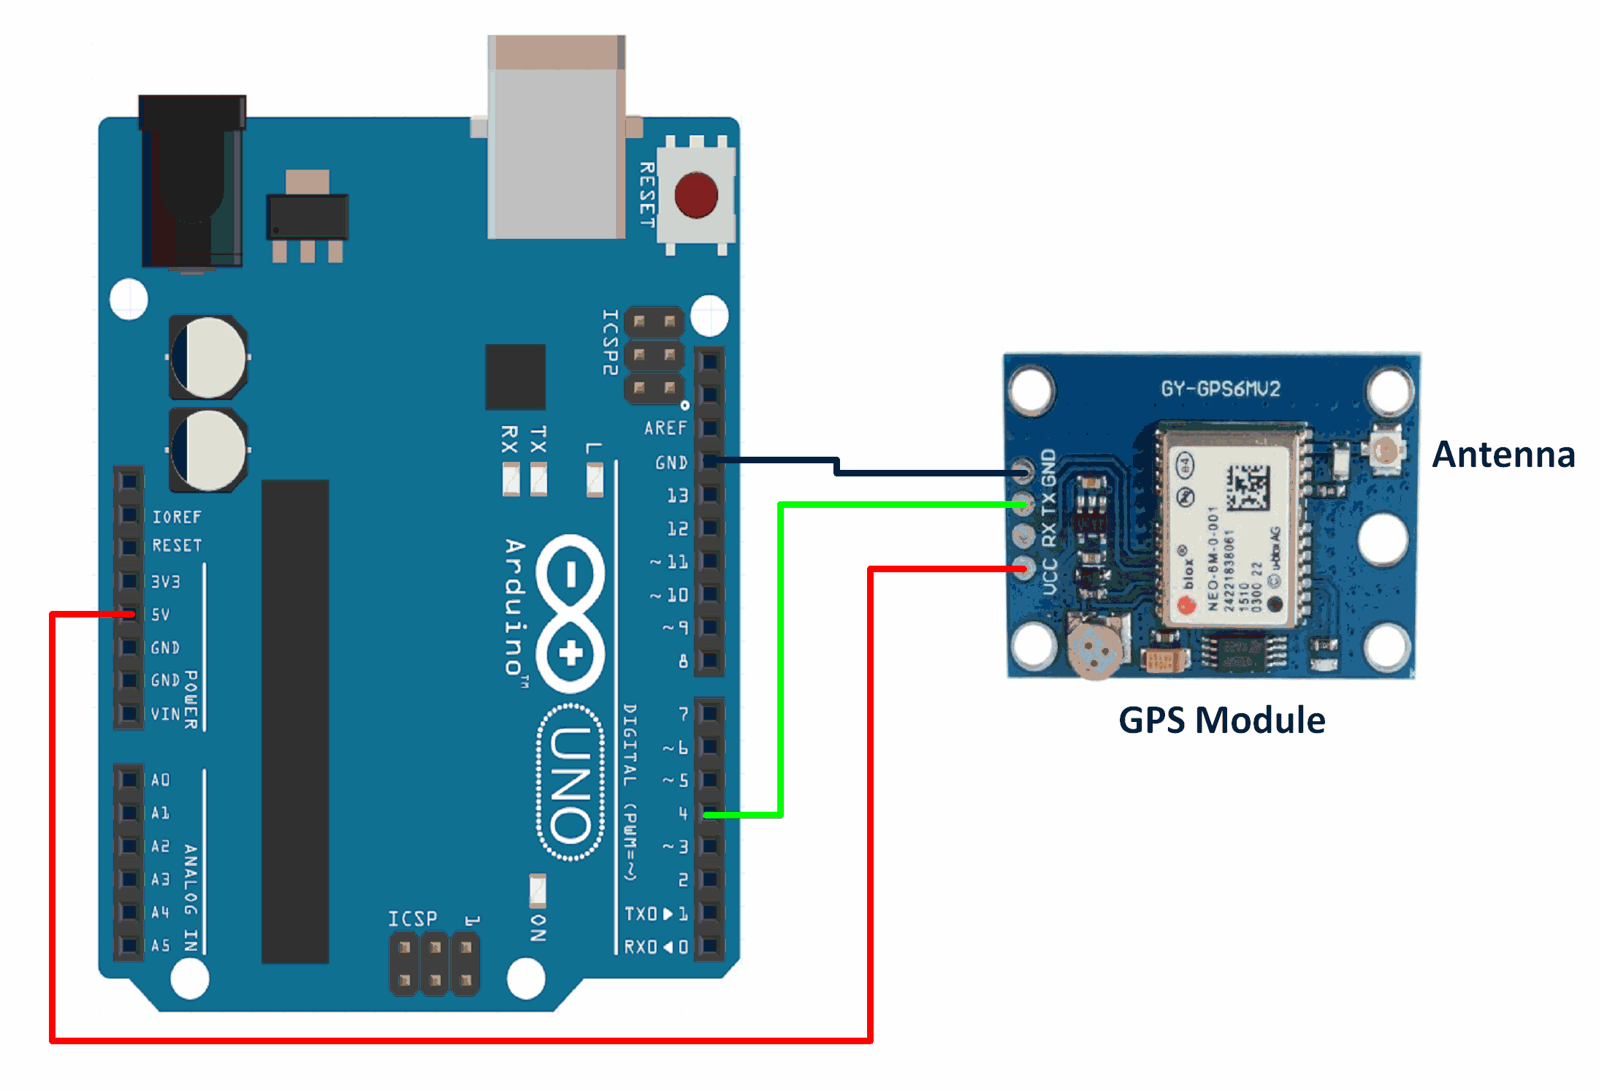
Am GPS-Modul befinden sich vier Anschlüsse, die du wie folgt mit deinem Arduino verbindest: Stecke zunächst die externe Antenne, wie auf den folgenden Bildern zu sehen, in ihren Anschluss auf der Platine. The data for longitude and latitude is displayed on the LCD and location can be viewed on app.This is an updated GPS module that can used with ardupilot mega v2. For interfacing, make the connections as follows: Connect Vcc of GPS module to Power Supply Pin (5V) of Arduino Uno.Grove compatible interface; Ublox NEO-6M GPS Module vs Grove – GPS Module vs Grove – GPS (Air530) When compared side by side: Things to consider NEO-6M Grove – GPS Module : Grove – GPS (Air530) Size: 23mm x 30mm: 40mm x 20mm x 13mm: 40mm x 20mm x 13mm : Update Rate: 1Hz, max 5Hz: 1Hz, max 10Hz – Baud . It is integrated with a high-performance GSM/GPRS chip, and as a bonus, it also has a GPS engine and a BT engine.TX on GPS shield to RX1 (pin 19) on Mega RX on GPS shield to TX1 (pin 18) on Mega 5v on shield to 5v on Mega GND on shield to GND on Mega.It has a powerful processor, 10 NeoPixels, mini speaker, InfraRed receive and transmit, two buttons, a switch, 14 alligator clip pads, and lots of sensors: capacitive .
Interfacing GPS Module With Arduino Uno : 7 Steps
Dive into the world of Arduino GPS applications with our detailed guide on interfacing the NEO-6M GPS module using the TinyGPSPlus library.In this tutorial, we will learn about NEO-6M GPS module and how to interface it with Arduino to obtain GPS parameters such as latitude, longitude, altitude date, time, speed, satellites, etc. You can interface this module easily with .Mega has 4 hardware serial ports, noted on the board. Connect Rx (Receiver Pin) of GPS module to D3 Pin of Uno. Use 1,2 or 3 and leave Serial free for USB access to the PC for programming and debugging.Interfacing Arduino with NEO-6M GPS module. Plug the SIM card into the board.
Send Receive SMS & Call with SIM800L GSM Module & Arduino
It can work with an operating voltage .Why are you using SoftwareSerial with a Mega which has 3 spare Hardware Serial ports that work much better.

GPS module finds the location (latitude, longitude) from the signals received from the satellite.Schlagwörter:GPS To ArduinoGps Module with ArduinoInterface Gps
GPS Module Interfacing With Arduino UNO
Breakout Arduino Wiring
It has four important connection points: VCC: This is where you connect the power to make the module work. Connect GND (Ground Pin) of GPS module to GND .Schlagwörter:Arduino MegaArduino Gps Step 1: Start with the GND connection. Next, connect the module’s Tx pin to the Arduino’s digital pin #3, as we will be communicating with the module via software UART.I want to complete my project with Arduino Mega and the two modules. I also soldered the antenna. coordinates of London). List of material Arduino Uno ==> $8 Ublox NEO-6m GPS module ==> $15. Plug the GPS antenna into the interface. I feed the A9G with a 3.The GY-NEO-6M module is an advanced GPS module that supports UART communication protocol with active antenna. Now let us see how we can use the SIM7600 GSM GPS 4G LTE with Arduino to use AT Commands for Call & SMS features.This tutorial shows you how to interface neo-6m GPS module with Arduino.As you can know that MQ3 module requires an operating voltage of 5V hence we will connect its VCC pin with 5V terminal of Arduino UNO.I have connected the Tx and Rx pins of the A9G module to the D3 and D4 of my arduino Mega.How To Connect The MPU6050 Sensor Module With Arduino UNO.How to interface GPS module with Arduino, how to get co-ordinates and display them on LCD longitude and amplitude with arduino uno r3.Now that you are familiar with the SIM800L module, it is time to connect it to Arduino! To begin, connect the antenna to the module and insert a micro SIM card into the socket. Oktober 2017 by Stefan Draeger. Simple Arduino Projects On MPU6050 And Arduino UNO. The SIM800L module is a low-cost GSM/GPRS module that supports Quad-band GSM/GPRS networks. Step 2: Connect the I2C Clock line.Here, we’re doing the simplest possible Interfacing NEO-6m GPS Module with Arduino. It supports the newest GPS devices, and there are many tips on the Installation and Troubleshooting pages.Basically, the SIM808 module is designed for the global market. The NEO-6M GPS module features four pins for connection: GND: This ground pin should be connected to the Arduino’s GND pin.Learn how get location from GPS module using Arduino and NEO-6M GPS module, learn how to get GPS coordinates (longitude, latitude, altitude), speed and date time, how to . Arduino UNO; SIM800L GPRS GSM Module; DC . What I want to achieve: Display a visual Compass on . Step 3: Connect the I2C data line. Connect GPS TX to Mega pin 19. In this project, I have shown how to interface a GPS module with Arduino UNO. GPS Modul NEO-6M. This post shows how to connect the Arduino with GPS module in order to receive data from satellites where the GPS module used in this project is u .Problem with Neo 6M and Arduino Mega 2560. Provides several serial interface options (SPI, UART, USB, etc) Supports RTC feature with built-in RTC crystal. The data for longitude and latitude is displayed on the serial .
This will power up the sensor. AEC-Q100 Qualified. Is there any possibility to make it work?Schlagwörter:Arduino MegaArduino Gsm Module Price
Newbie trying to interface Arduino Mega with Ultimate GPS v3
Fehlen:
mega NeoGPS is available from the Arduino . This GPS module uses the latest technology to give the best possible position information, allowing for better performance with your . Arduino reads information from the GPS module via serial communication (UART).Schlagwörter:GPS To ArduinoEsp32 Gps Neo-6M ExampleGt U7
Guide to NEO-6M GPS Module Arduino
Das GPS Modul hat leider nicht zuverlässig im .

If not, you will have to connect it to the 3. Next, the GND of the Arduino is connected to the GND of the MPU 6050. Operates from 2.
Interfacing BMP280 Barometric Pressure Sensor Module with Arduino
- Nikolausgruß grundschule _ nikolaus grundschule pdf
- Wie viel sind 60 dollar $ in € zum heutigen kurs – wechselkurs dollar in euro heute
- Rosetti ceramiche: yvonne rosetti ceramiche
- Conversione temperatura – temperature converter f to c
- Schuko® doppelsteckdose alpinweiß – jung schuko steckdose alpinweiß
- 300 watt balkonkraftwerk test: die 10 besten im vergleich, balkonkraftwerk 300 watt erfahrungen
- Wiegen viel wie sie – was heißt wiegen
- Zuhause 2 versch. netzwerke: 2 netzwerkverbindungen gleichzeitig
- Social identity theory—are we the company we keep? – social identity theory
- Top 10 fitnessstudio dormagen _ flexx fitness dormagen